Tuesday, August 31, 2021

Back to School! Pencil Case Tutorial

School has started! Hallelujah! All 3 of my boys went back to school yesterday, and today is the first full day. Happy dance for Momma!

 So of course, last week we did the official school supply shopping trip. So.many.pencils! Which reminded me of this fun tutorial I put together a couple years ago for PBS Fabrics using the Ring Ring collection. The fabric may be hard to be find by now, but the tute still works! My kids still have (and use, although not for school) these pencil cases. 


This pencil case measures 5-1/2" x 9"--perfect for holding newly sharpened #2s!


Ring Ring Pencil Case

You'll Need:
1 fat quarter each of (4) pencil prints and (1) blue dot print
(1) 12" zipper in a coordinating color
(1) 10-1/2" square of fusible batting


Cutting:
From each pencil print:
(1) 3-1/2" x 10-1/2" piece

From the blue dot:
(1) 10-1/2" square
(2) 1-1/2" x 3" pieces

Make the Pencil Case:
Step 1 Sew the (4) 3" x 10-1/2" pencil pieces together lengthwise.


Step 2 Fuse the 10-1/2" batting square to the back and quilt as desired. I stitched 1/4" on each side of the seams.


Step 3 Press in 1/4" on both short ends of the 1-1/2" x 3" blue dot pieces as shown. Fold and press the piece in half. 


Step 4 Tuck the zipper pull end of the zipper into the center fold of a blue dot piece. Stitch across the zipper to secure both sides of the blue dot piece to the zipper as shown. Align the zipper with the pieced bag square and trim the opposite zipper end 1/8" in from the end. Be careful not to pull the zipper apart! 


Step 5 Tuck the raw end of the zipper into the second folded blue dot piece and stitch to secure. Your zipper with tabs should be the same length as the pieced bag square.


Step 6 Trim the blue dot tabs even with the zipper width. 


Step 7 Lay the zipper right side down on the pieced bag square as shown and pin into place.


Step 8 Layer the 10-1/2" blue dot square right sides together on the zipper. Pin into place and stitch, using a zipper foot. 
Step 9 Press the pieced bag square and blue dot square away from the zipper. Topstitch 1/4" from the edge of the zipper. 


Step 10 Align the opposite end of the pieced square with the other side of the zipper, right sides together, and pin. 


Step 11 Fold the blue dot lining square back onto itself and align with the zipper. Pin in place and stitch using a zipper foot. 


Step 12 Turn the case right side out. Topstitch along the second zipper edge is a little trickier. You'll need to manipulate the case so the zipper edge where you're stitching is in the zipper opening, and ensure that the rest of the case doesn't get in the way. 


Step 13 At this point, your case should look like this. Press it flat so the zipper is centered.


Step 14 Turn the case wrong side out. Make sure the zipper is open! Stitch along each end using a 1/4" seam allowance. Use a zig zag stitch to finish off the raw edges. 


Step 15 Turn the case right side out and fill with pencils. 


The pencil print is an obvious choice for this case, but I love this monochromatic version as well. 


Each of my boys ended up making their own cases (with a little help) after I made these first two. This is from 3 years ago--I can't believe how much they've grown since this picture!


If you're new here, welcome! I hope you'll stay and look around a bit. 
If you like what you've seen here, you can also find me:
To find all of my quilt patterns, visit my Etsy shop
Find me on IG here.
Find me on Facebook here.
Sign up for my newsletter in the right-hand sidebar or here
(You'll receive a free pattern for my Diamond Drama quilt (below) as a thank you!)

Friday, August 20, 2021

Introducing Star Bows!

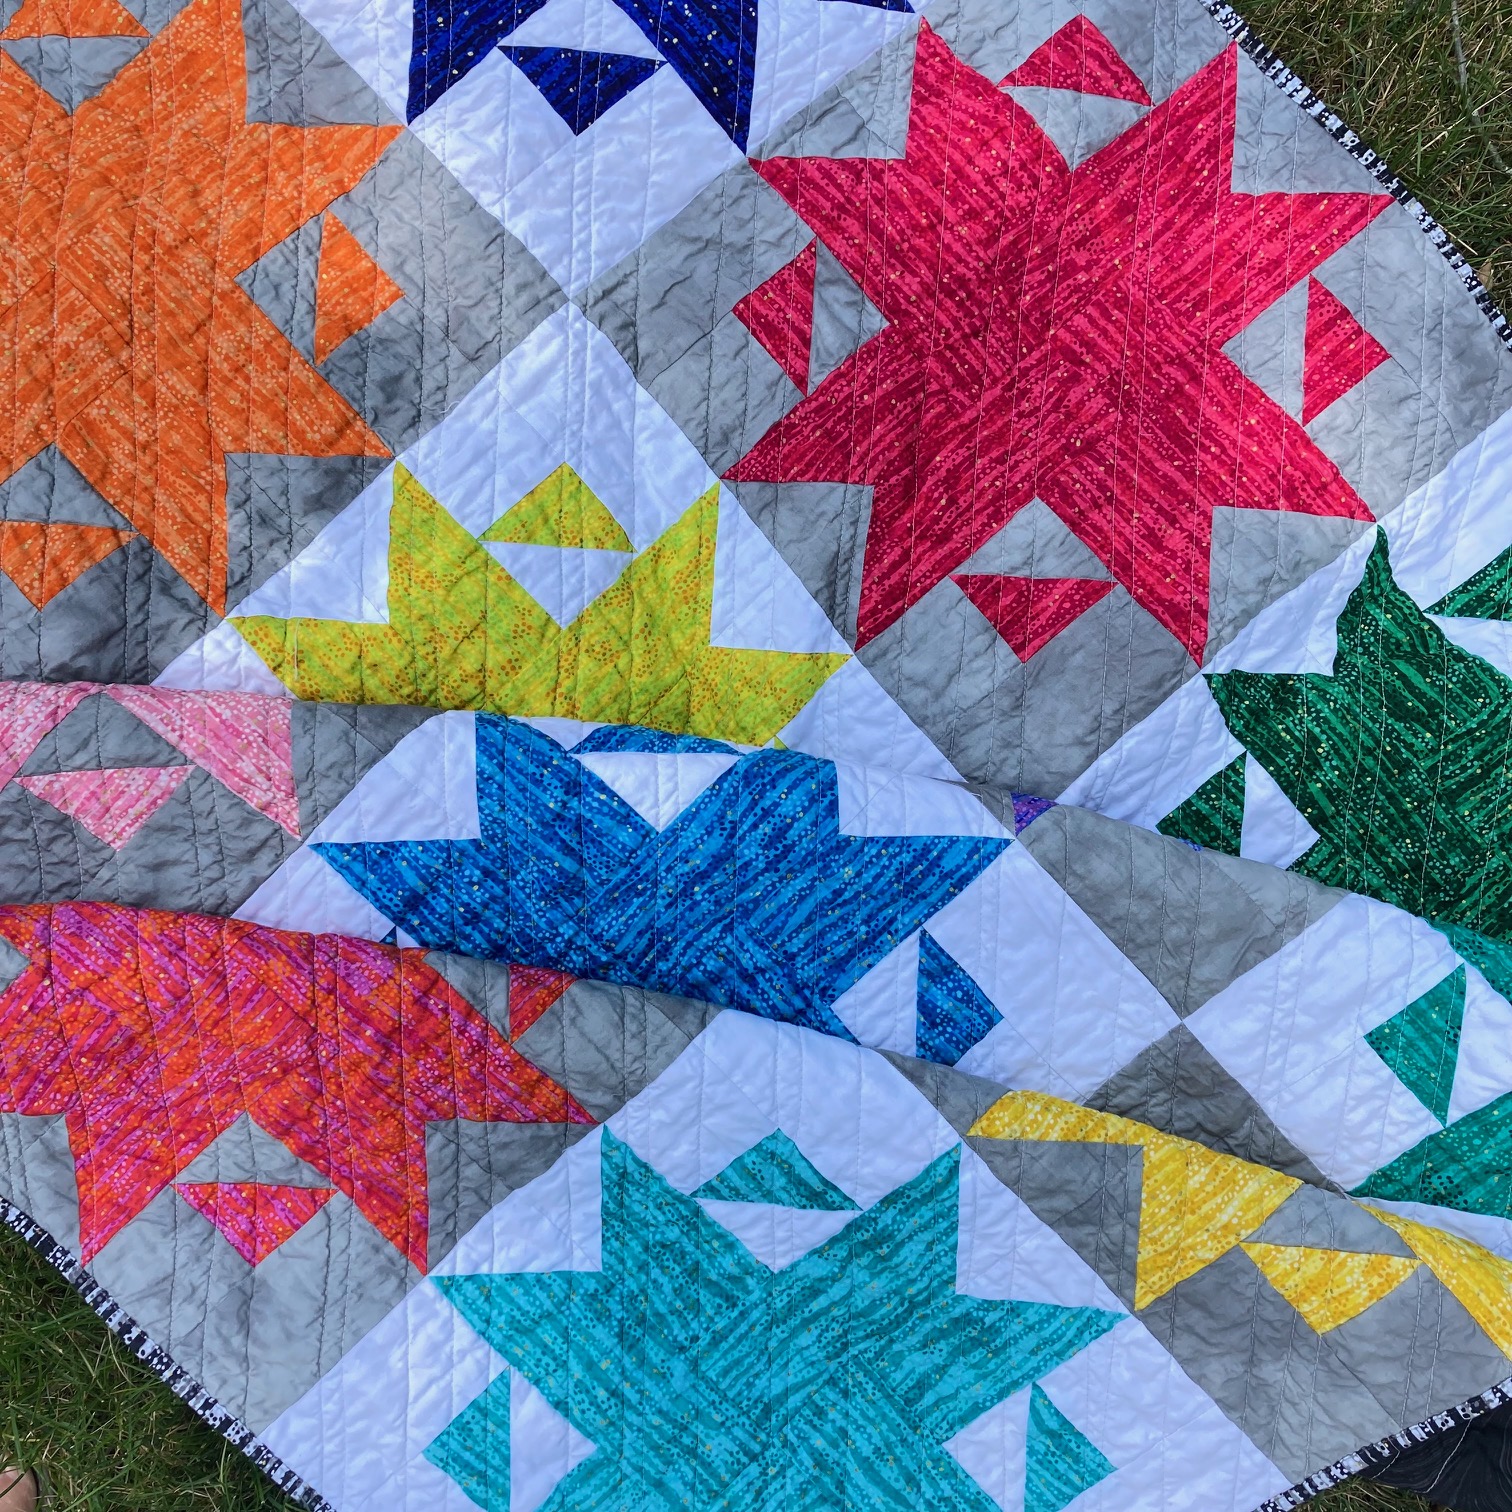
Today I'm excited to share my new Star Bows pattern with you. I love these oversized star blocks! They remind me of bows on gifts - do you see it too? I'd love to make this quilt in Christmas fabric next! Or maybe just a table runner? That seems more do-able before the holidays this year! 
Purchase the Star Bows pattern here.

I used the Dewdrop collection from Windham Fabrics for my quilt. I love the bright range of colors, plus the subtle stripes in the print. The icing on the cake? metallic dots! Aren't they gorgeous?! And did I mention that this pattern is fat quarter friendly?


The secret to this block is the direction the stripes run - they create movement in the star points. I think the alternating white and gray background colors add an extra pop to this quilt as well. 


The pattern includes directions to make this two-color version as well.
It gives the stars a completely different look!

Since it's August, my brain is in picnic mode. Wouldn't this make a fantastic picnic quilt? I took the quilt out to Paw Paw Lake for a little photoshoot - so summery looking!

Ready to make your own Star Bows quilt? You can purchase the pattern in my Etsy shop


If you're new here, welcome! I hope you'll stay and look around a bit. 
If you like what you've seen here, you can also find me:
To find all of my quilt patterns, visit my Etsy shop
Find me on IG here.
Find me on Facebook here.
Sign up for my newsletter in the right-hand sidebar or here
(You'll receive a free pattern for my Diamond Drama quilt (below) as a thank you!)


Wednesday, July 7, 2021

Rainbow-licious with Mini Quilt finish!

 Happy Wednesday! 

Today I'm sharing a tutorial on the Thermoweb blog to make this Rainbow-licious Pillow (doesn't the pom-pom trim just finish it perfectly?!). Find the tutorial here


I also made a second version that I turned into a small wall hanging, and I'm going to share the finishing steps for that quilt below. 

To make this project, follow the materials list and steps for making the rainbow (up through step 5) on the Thermoweb blog. You won't need the fiberfill or the pom-pom trim. You will need (2) 2-1/4" x WOF strips for binding. 

Finishing the Quilt
Step 1 After adhering the Fusible Fleece to the wrong side of the rainbow top, add the 14" x 18" backing piece - I used SpraynBond Basting Adhesive to secure it. Quilt your piece as desired. I did diagonal straight lines with my walking foot. Tip: I admit I'm lazy about marking quilts, so with a small quilt like this, I just mark the first line and then line up the edge of my walking foot for the rest!


Step 2 Square up the quilted piece to your desired measurement. I just squared mine up so it measures approximately 17" x 13". 

Step 3 Use the (2) 2-1/4" x WOF binding strips to bind the quilt. That's it!


I hope you like these rainbow projects as much as I do!


If you're new here, welcome! I hope you'll stay and look around a bit. 
If you like what you've seen here, you can also find me:
To find all of my quilt patterns, visit my Etsy shop
Find me on IG here.
Find me on Facebook here.
Sign up for my newsletter in the right-hand sidebar or here
(You'll receive a free pattern for my Diamond Drama quilt (below) as a thank you!)


Tuesday, July 6, 2021

Stitch and Flip Mountain Block

I've been playing with improv piecing lately (new quilt coming soon!), and when I saw the July Quilt Block Mania prompt was vacation, I knew exactly what I wanted to make. Our family is in the middle of a 3-week vacation out west--the Black Hills of South Dakota to Grand Teton and Yellowstone National Parks, and finally to Montana. So I clearly have mountains on my mind! 


I used improv piecing to add a little detail and scrappy goodness to each background (aka mountain) and then made those backgrounds into flying geese. Instant mountain block! 


The tutorial for making this block is on my subscribers only page - if you receive my newsletter, you'll find the link in the latest email. If you don't yet, you can subscribe to the newsletter in the right hand sidebar and you'll receive an introduction email with the link. I hope you enjoy making it!


Make sure to check out all the other vacation themed blocks being shared this month!

Bridge Quilt block by Carolina Moore
Lucky is on the road again at Puppy Girl Designs
Scenic Route by Slice of Pi Quilts
Travel to the Woods by Oh Kaye Quilting
Embark by Inquiring Quilter
Delectable Mountains at PhoebeMoon Designs
Treasure Chest Star by Blue Bear Quilts
Wanderlust by Heidi Pridemore
On the Water by Patti's Patchwork
Come Sail Away by Mom and Me Quilting Co.
Wish You Were Here at Pretty Piney Quilts
Pack It Up by QuiltFabrication
Me and Bobby McGee at Orange Blossom Quilt Design Studio
Wild Blue Yonder at Perkins Dry Goods
Take a Hike by Devoted Quilter
Into the Blue at Duck Creek Mountain Quilting
T-Shirt Fun at The Quilting Room with Mel
Stitch and Flip Mountain Block

Thursday, July 1, 2021

Monthly Color Challenge - July!

 I'm happy to say that I caught up on the Monthly Color Challenge from Patterns by Jen! Just in time, since I'm one of the July bloggers. :) 


The color for July is lime. Do you know what I like to use lime for? Mojitos. I highly recommend this refreshing summer drink, if you've never tried it. Mint and lime...yum! I was first introduced to mojitos at a restaurant called Nacional 27 in Chicago, about 20 years ago. The restaurant and the drink quickly became favorites. 

Here's a recipe if you want to try it yourself: Mojito recipe from Love and Lemons


Back to quilting...here's my block for July:

I picked my greens based on the darker greens of lime peels.


And here's a look back at my May and June blocks. I'm loving how the low volume backgrounds look with Jen's great block designs!


This orange block is my favorite so far!

Here are all of my blocks, January - July:

I"m already thinking about how to combine the blocks into a quilt at the end of the year. Do you have plans for your blocks? 

Make sure to check out all the other featured July bloggers:

Jen - Patterns by Jen

Kate - Katie Made Quilts

Brenda - Songbird Designs

Raylee - Sunflower Stitcheries

Andi -True Blue Quilts

Crystal - Daybrook Designs

Patti - Patti's Patchwork

Anne - Said with Love

Ashli - Quilt 2 End Alz


If you're new here, welcome! I hope you'll stay and look around a bit. 
If you like what you've seen here, you can also find me:
To find all of my quilt patterns, visit my Etsy shop
Find me on IG here.
Find me on Facebook here.
Sign up for my newsletter in the right-hand sidebar or here
(You'll receive a free pattern for my Diamond Drama quilt (below) as a thank you!)

Saturday, June 19, 2021

Echo in Plum Pudding Fabrics!

Have you been following the Plum Pudding Blog Tour? 

Plum Pudding is the new signature line for Island Batik and I was eager to join the blog tour with Sherry from Powered by Quilting. I'm excited that it's my day to show off what I've made with this gorgeous fabric! I'm a big fan of batiks, and the palette for this collection is fantastic--low volume, deep blues, wintry prints...what could be better? 


When I saw the Plum Pudding fabrics, I thought immediately of my Echo quilt pattern, which uses low volume prints. But then I decided to switch things up and use the darker blues in the "background" and the low volume and lighter prints for the main design of the quilt. I think it looks almost like an eight-pointed snowflake!

The Echo quilt is made up of four jumbo log cabin blocks. Which means once the blocks are complete, the quilt is practically done--only four blocks to join!

I love the texture from the machine quilting. I started out quilting straight lines centered horizontally, vertically and diagonally. Then I quilted every other eighth with straight lines.  And then I just.couldn't.sew.any.more.straight.lines. So I did the alternating eighths with wavy lines using the free motion foot. I really like the contrast the two types of lines created! 


Since there's no snow on the ground in June, I had my quilt holders stand in front of a group of pine trees (which you can barely see in this picture!). Pine trees seemed a little wintry to go with my snowflake quilt.

The Echo quilt is available in my Etsy shop and is 20% off through June 26th using code ECHO20.
Find it here.

Make sure to visit all the other designers on this Plum Pudding blog hop!
June 19 - Lisa at Love to Color My World (that's me!)

And one more quilt shot...into the sunset!

You can also find me:
To find all of my quilt patterns, visit my Etsy shop
Find me on IG here.
Find me on Facebook here.
Sign up for my newsletter in the right-hand sidebar or here

Wednesday, June 16, 2021

Summer Coasters Tute with Liquid Vinyl

It's finally summer! I don't know about you, but my family has started eating outside on the deck whenever we can. When Thermoweb sent me a jar of Liquid Vinyl, I knew I wanted to make some weather-resistant placemats for our outdoor meals (bonus with kids--they can be wiped down after they're spilled on!) I used the BBQ Block Party prints from PBS Fabrics, paired with matching solids, to make these placemats. I love the fun prints in this collection--so summery, and perfect for outdoor dining!
Head over to the Thermoweb blog to find my tutorial for these placemats. 


I used the leftover fabric from my placemat project to make these hourglass coasters.


Use the tutorial below to make your own!

You'll Need: (for 2 matching coasters)
(1) 6" print square
(1) 6" solid square
(2) 5" backing squares
(2) 4-1/2" squares HeatnBond Fusible Fleece
HeatnBond Liquid Vinyl
Thermoweb Pressing Paper

Here are my two 6" squares for my coaster:


Making the Coaster:
Step 1
Draw a diagonal line on the wrong side of the 6" print square.


Step 2 Layer the marked square and solid square right sides together and stitch 1/4" on both sides of the drawn line. 


Step 3 Cut on the drawn line. Press both HST units open, pressing the seam allowance toward the solid fabric.


Step 4 Draw a diagonal line on the wrong side of one HST, perpendicular to the seam line. Layer the HSTs right sides together, with the print fabrics opposite each other. Nest the seams and pin in place.


Step 5 Sew 1/4" on both sides of the drawn line. Cut on the line and press both units open. 


Step 6 Trim hourglass unit to measure 5" square. Make sure to align the diagonal line on your ruler with the seam to ensure that your hourglass is centered and the seams intersect each corner. 


Step 7 Position the fusible fleece square to the wrong side of the hourglass unit, centering it so the hourglass unit extends 1/4" on all sides. Fuse in place.


Step 8 Layer the hourglass unit right side up with the backing square on top, right side down. Stitch around all sides using a 1/4" seam allowance and leaving an opening along one side for turning. Tip: Backstitch at the beginning and end of your stitch lines so stitches don't pull out while you're turning the coaster right side out. 


Step 9 Trim corners and turn the coaster right side out (see tip below). Poke the corners out as much as you can. Press the coaster, making sure raw edges are tucked in. Machine quilt the coaster, starting 1/8" from coaster edges to close the opening from turning. 


Turning tip: Before turning the coaster right side out, press the raw edges around the opening as shown. This will make it easier to create a straight folded edge along the opening that you can topstitch shut. 

Step 10 Repeat steps 6-9 with second hourglass unit, backing, and fusible fleece to make a second coaster. 

Step 11 Following manufacturer's directions, applying 1-3 coats of Liquid Vinyl to both sides of the coasters to make them water resistant. Use Pressing Paper to iron coasters between coats as instructed on the directions. 


Enjoy your coasters! And make sure to stop by the Thermoweb blog to find the placemat tutorial!


You can also find me:
To find all of my quilt patterns, visit my Etsy shop
Find me on IG here.
Find me on Facebook here.
Sign up for my newsletter in the right-hand sidebar or here