Tuesday, September 3, 2013

Challenge 4 Art: Blue

It's the second deadline for our Challenge 4 Art project. The theme? "Blue."

The other three talented quilters in our little group are:
Amy of Amy's Crafty Shenanigans
Claudia of Machen und Tun 
Susannah from fiberchick 
Be sure to check out their projects too when you're done here! I can't wait to see what everyone came up with.

I chose to create a landscape quilt of some of the most vibrant blues I've ever seen--in the Whitsundays, a group of islands located in the Great Barrier Reef.  I was lucky enough to visit the area eleven years ago with my now-husband and my parents. We spent one magical afternoon on Whitehaven Beach--one of the most beautiful beaches in Australia. Part of the allure of the beach is a cove with a significant tide change--it creates a swirled look as it goes in and out. My words (nor my photos, shown below from my pre-digital-era scrapbook!) do not do any of it justice!

One of our souvenirs from the trip was a full set of Peter Lik's Out of the Blue books, chock full of absolutely gorgeous photography of Australia. I couldn't find the book online to link to, so I took a (bad) photo of my book so you could better see the cove and the swirling tide.

Here is my piece, which likely will be a continued work in progress. The details are comprised primarily of thread painting (detailed photos below), and every time I look at it, thinking it's finished, I find more areas where I think it needs a little more work.

Unlike the first project, I had my idea for this project pretty early. The tough part was finding time to do it. If I'd had 6 months or so to make it, I would have constructed it differently than I did--it was definitely a learning experience. In retrospect (and with more time), I would have traced each shape onto fabric, auditioned the pieces together, and then removed them all and layered and quilted each layer individually. But not knowing how it was going to turn out, I layered all the fabrics first, some with fusible web and others just pinned, and then began stitching on top.

Here it is with very little stitching on it:

I had a vision in my mind (which I haven't quite reached yet!). I wanted to use fabrics for the main sections and then create the details and shading with threadwork. I knew this project would be a challenge because I really wanted it to look realistic, and I wasn't sure that I could accomplish that. But a challenge is the perfect place to try something outside of my comfort zone, to stretch a little. And I'm still stretching, because I'm not in love with this yet. But it'll get there, and hopefully that happens before it's so stiff with thread that it stands up on its own!

I love the thread painting going on here, but I struggled with achieving shading that would create depth as the water and sand sink into the background. That's the area I'd really like to go back and work on.

I used strips of different blue fabrics to create the gradation in the water.

I can't wait to see how everyone else interpreted "blue!"
You can see my June challenge (and find the link to the other ladies as well) here.



Saturday, August 31, 2013

August Goal...complete!

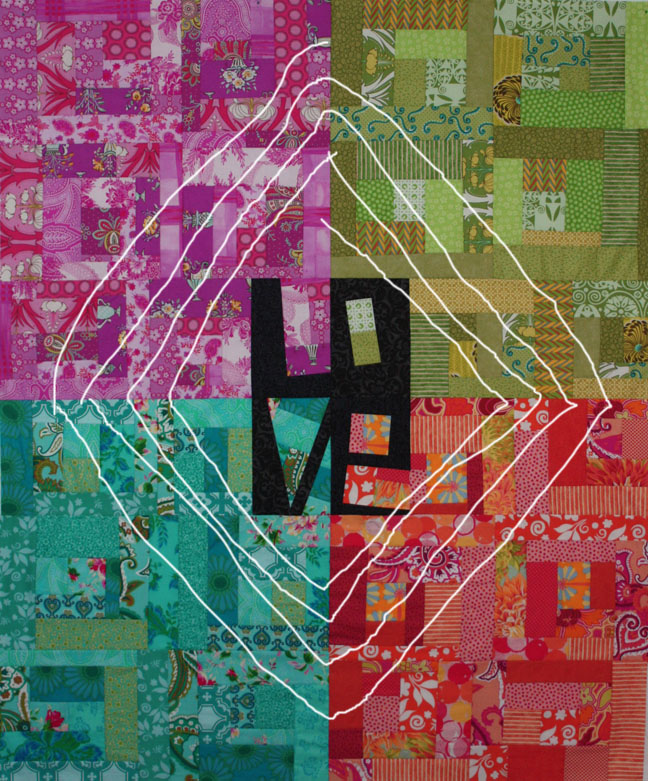
My August Lovely Year of Finishes goal was to get my "LOVE" quilt quilted. 
Done!
So far, this is probably the quilt that I put the most time thinking and planning how I was going to quilt it--I just couldn't decide, and some of the things I wanted to do, I didn't feel like I could actually accomplish.

What I ended up doing:
--1/4" spaced straight line quilting in the letters; pebble quilting around the letters, and then "stripes" in a diamond around the center section. The stripes are alternately filled with wavy lines and circles.

I am happy with how the patchwork is still the main focus of the quilt--that was my main concern, making sure the quilting didn't distract from the piecing. I'm looking forward to getting this bound so I can wash it...hide some of the not as great stitches!

Tuesday, August 20, 2013

So satisfying...

Quilting has taken back seat to all the usual summer fun this year, so I'm especially excited about this finish because it's been a while since I've had one.

My sweet nephew, Baby J, was born in April, right around when I was first working on this quilt. In a few days, the postman will be delivering this: 

I had it quilted at one of the local quilt shops here in town, the Bernina Sewing Center. I wanted a fairly simple pattern that wouldn't take away from the busy-ness of the fabrics, but that also had a modern feel. I really like how the pattern looks on the quilt!

An orangey-red dot is on the back, and I used the same fabric from the sashing for the binding.

Can't wait for this gift to arrive!
And next? Another niece was born last Friday. Looks like it's time to start another baby quilt!

Monday, August 5, 2013

Lovely Year of Finishes August Goal

It's time for an August Lovely Year of Finishes goal. I'm working on reducing my pile of quilt tops, so my August goal is to get another one quilted on my home machine.

This one, from a Tula Pink pattern:

I currently have two thoughts on how to quilt it...the first is to do straight line quilting in a square spiral like I've drawn below (except with straighter lines...excuse my Photoshop skills, but you get the idea!).

The second is to quilt each quadrant differently, similar to Tula's original pattern, except using simpler, easier-to-execute designs. I'm a little concerned my version might be too busy for this type of quilting, though.

I'm open to opinions and other ideas. What do you think?


Wednesday, July 31, 2013

July Lovely Year of Finishes Goal Complete!

I posted back at the beginning of the month that my July Lovely Year of Finishes goal was to sew a zafu meditation cushion for my lovely friend Diane. 

And...drumroll, please...I finished! 


I used this tutorial and the home dec fabric that Diane chose. It was great practice in making pleats and sewing circular shapes. I made a lining pillow out of muslin first--a trial run for using the more expensive outer fabric. I also got "fancy" and put a zipper in the lining pillow as well. The cushion gets filled with buckwheat hulls, and this way Diane can adjust the fullness as she likes. 

(Not the most exciting photos; sorry! But the cushion is quite comfy!)

 Six months of fulfilled goals; six months to go!


Sunday, July 7, 2013

Lovely Year of Finishes July Goal

Popping in on the last day of a relaxing 4th of July long weekend to post my July goal for the Lovely Year of Finishes. I've been 6 for 6 so far this year, so this whole monthly goal strategy has worked really well!

A couple months ago my good friend Diane asked me to sew her a zafu meditation pillow. I did some fabric reconnaissance and she picked this home dec weight fabric, which I then ordered.

I found a pattern here, and this is what the pillow looks like.

I know she's looking forward to (finally) using this pillow, so I'm looking forward to getting it done during July!

p.s. I received an email that I was selected as one of the winners from the June Lovely Year of Finishes winners! My prize? A $25 gift certificate to Superior Threads. How cool! I do not pretend to be a thread connoisseur, though. Suggestions? What would you use it on? 


Tuesday, July 2, 2013

Ready for July 4th! (including tutorial)

It's July 2nd, which means it's time for me to get inspired to create another last-minute 4th of July project. You can see last year's here, as well as in the background of the photo below.

This year's project?
I'm taking my two boys (4 and almost 2) to a local July 4th parade on Thursday, and on Sunday, I decided they needed flag shirts. But I wasn't going to buy them at Old Navy. So Monday when Hobby Lobby opened (I understand why they're closed on Sundays, but it's rough on a spur-of-the-moment crafter!), I bought a few red, white and blue t-shirts ($3.99 at Hobby Lobby, and then 30% off!).

Here are the finished shirts; the tutorial for how I made them is below.


You'll need:
1 red shirt (to wear)
1 each blue shirt and white shirt (to cut pieces...or cotton jersey fabric)
Fusible Web
Featherweight Interfacing

First, decide how big you want your flag to be (based on t-shirt size). On the size small t-shirt (the red one), I went with a 6" x 9" flag. On the 2T t-shirt, I went with 4" x 6". For the remainder of the tutorial, I'm going to use the measurements for the larger shirt and put those for the smaller shirt in parentheses. 

I sketched out the rectangle and decided on a stripe width: 1" (1/2"). Cut 1" (1/2") strips from the t-shirt and then cut them into 9" (6") lengths. Lay the t-shirt out flat and cut strips that are loops, starting at the bottom.
Cut fusible web strips that measure 3/4" x 9" (3/8" x 6"). Center and adhere a fusible web strip onto each white t-shirt strip.


Cut a 3-1/2" (2-1/2") blue square from the blue t-shirt. Cut a 3" (2") fusible web square. Adhere the fusible web square to the center of the blue square.

Cut a piece of light interfacing larger than your intended flag. Mine was 7" x 10" (5" x 7"). Turn the t-shirt inside out and fuse in place, centering it right to left and a little up from center top to bottom. Turn t-shirt right side out.

Position the white strips in place. You can eyeball the spacing for the red stripes to show through (I did) or measure. Position the blue square and slide the top couple white strips to the right. Trim the strips with a scissors to create a straight right edge for the flag. Fuse the square and strips in place.

Topstitch the stripes and square to the t-shirt to secure. Tip: I used a walking foot to avoid stretching issues. Stitch 1/4" in from the edges of the white stripes and the blue square, which will allow the jersey material to curl up a bit.


To make the star, I googled "star shapes" and picked one I liked. I sized it to measure 1" smaller than my square and printed it out. I traced it onto fusible web and cut it out on the line. Then I fused it to the white t-shirt material and cut it out just past the fused edges (again, to create the nice curl on the fabric). Fuse to the blue square and stitch near the edges.


My next step: wash the shirts to enhance the curl of the jersey material. My two boys will be sporting their flag shirts Thursday morning!
(For the blue shirt, I cut red stripes as well as white, and did not cut a blue square--I just added the white star to the opening in the upper left corner of the stripes!)

And another photo of my flag door quilt, on my beautiful newly painted front door!

If you're the last-minute type as well, making a shirt only took me 45 minutes. You still have time!


Sharing this on Quilt Story's Fabric Tuesday.