Showing posts with label Michael Miller Fabrics. Show all posts

Wednesday, November 16, 2022

Christmas Blog Hop!

It's Strippy Improv Holiday time! 


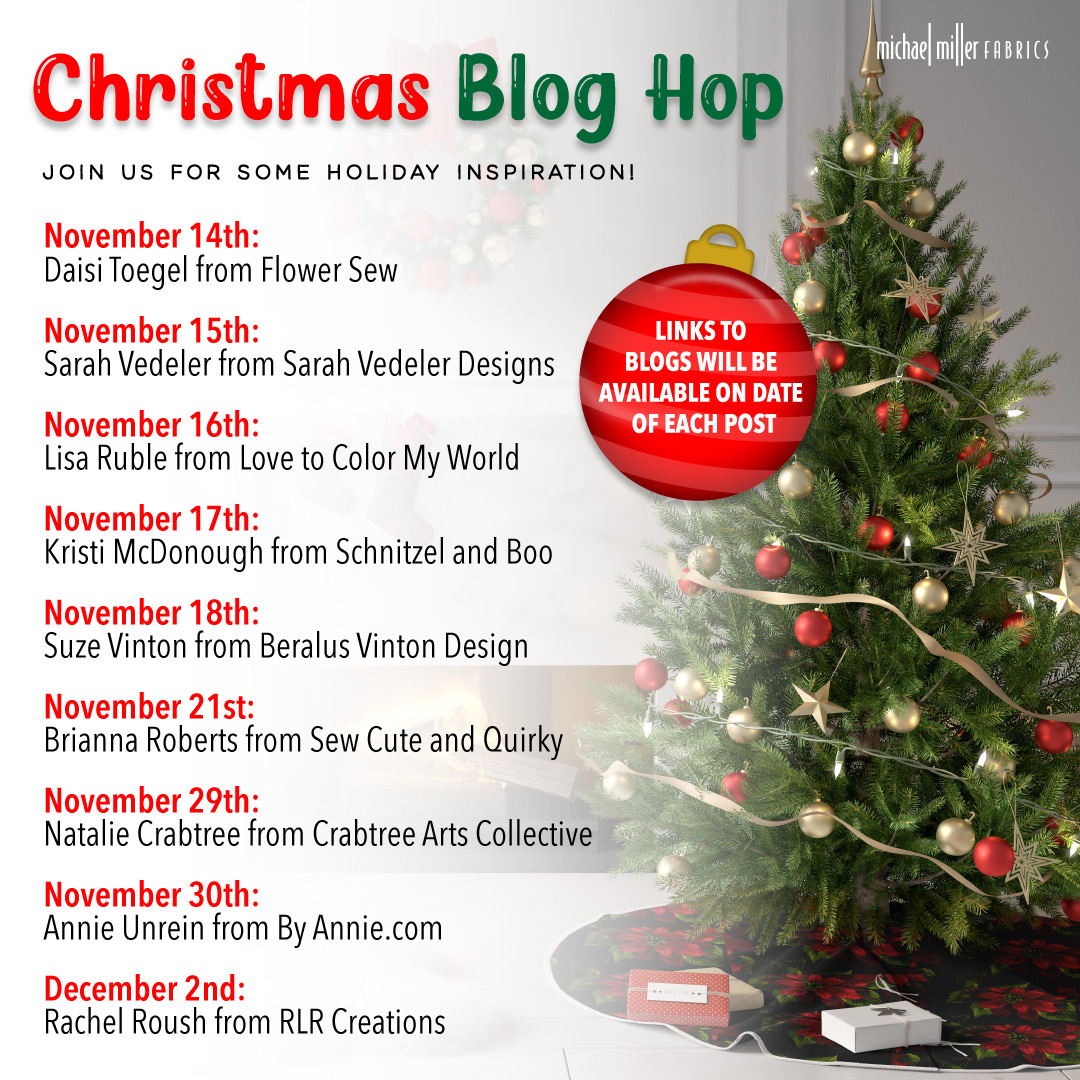
Michael Miller Fabrics invited me to be part of their Christmas Blog Hop, and I knew I needed to make a very Christmas-y Strippy Improv Holiday wall hanging. (Psst...keep reading for the giveaway info!)

Hello, candy canes and Christmas trees! The strippy improv technique combines improv strip piecing with reverse applique to make blocks that look different every time. Keep reading to the bottom to find out details for joining the Strippy Improv Holiday QAL, starting today! 


Here are the fabrics I chose. The Santa print worked perfectly to tie together the red and green prints! The cheery vintage Santa face reminds me of a door decoration my grandma had when I was little. You'd pull on the grinning Santa head and it would play music. We loved it!
I used the candy canes on the back of the quilt.


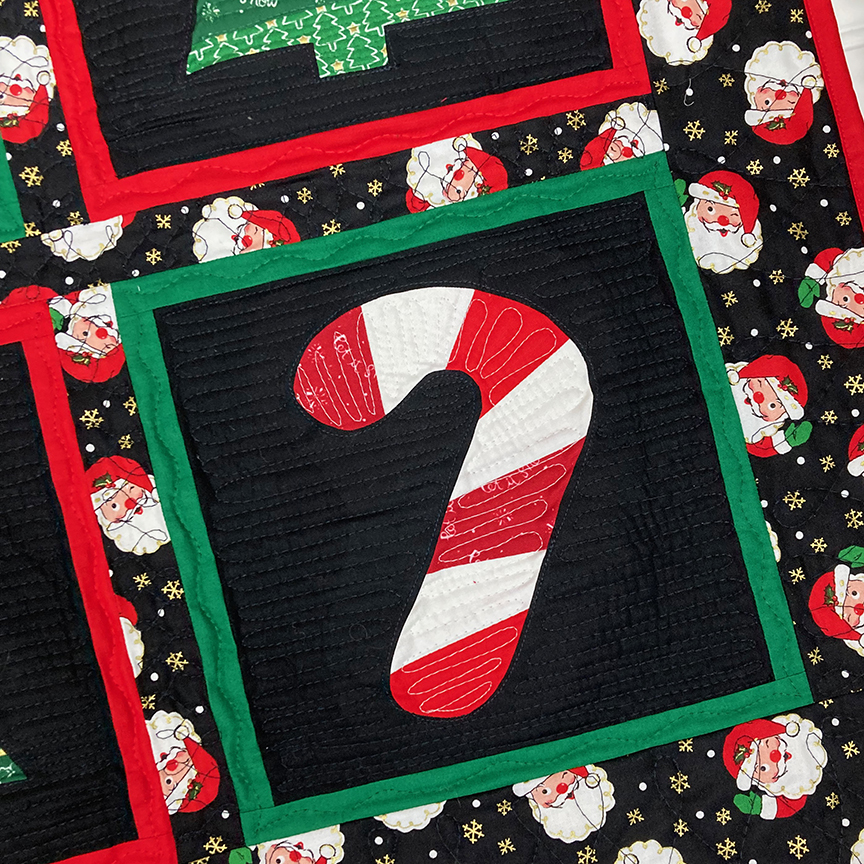
Here's a close-up of the candy cane block. I can almost taste the peppermint! 

And the tree...I love how the greens play together!


Giveaway!
I had enough fabric left to put together a Strippy Improv Holiday kit to make a quilt just like mine. For a chance to win, find me on Instagram (@quiltyzest).


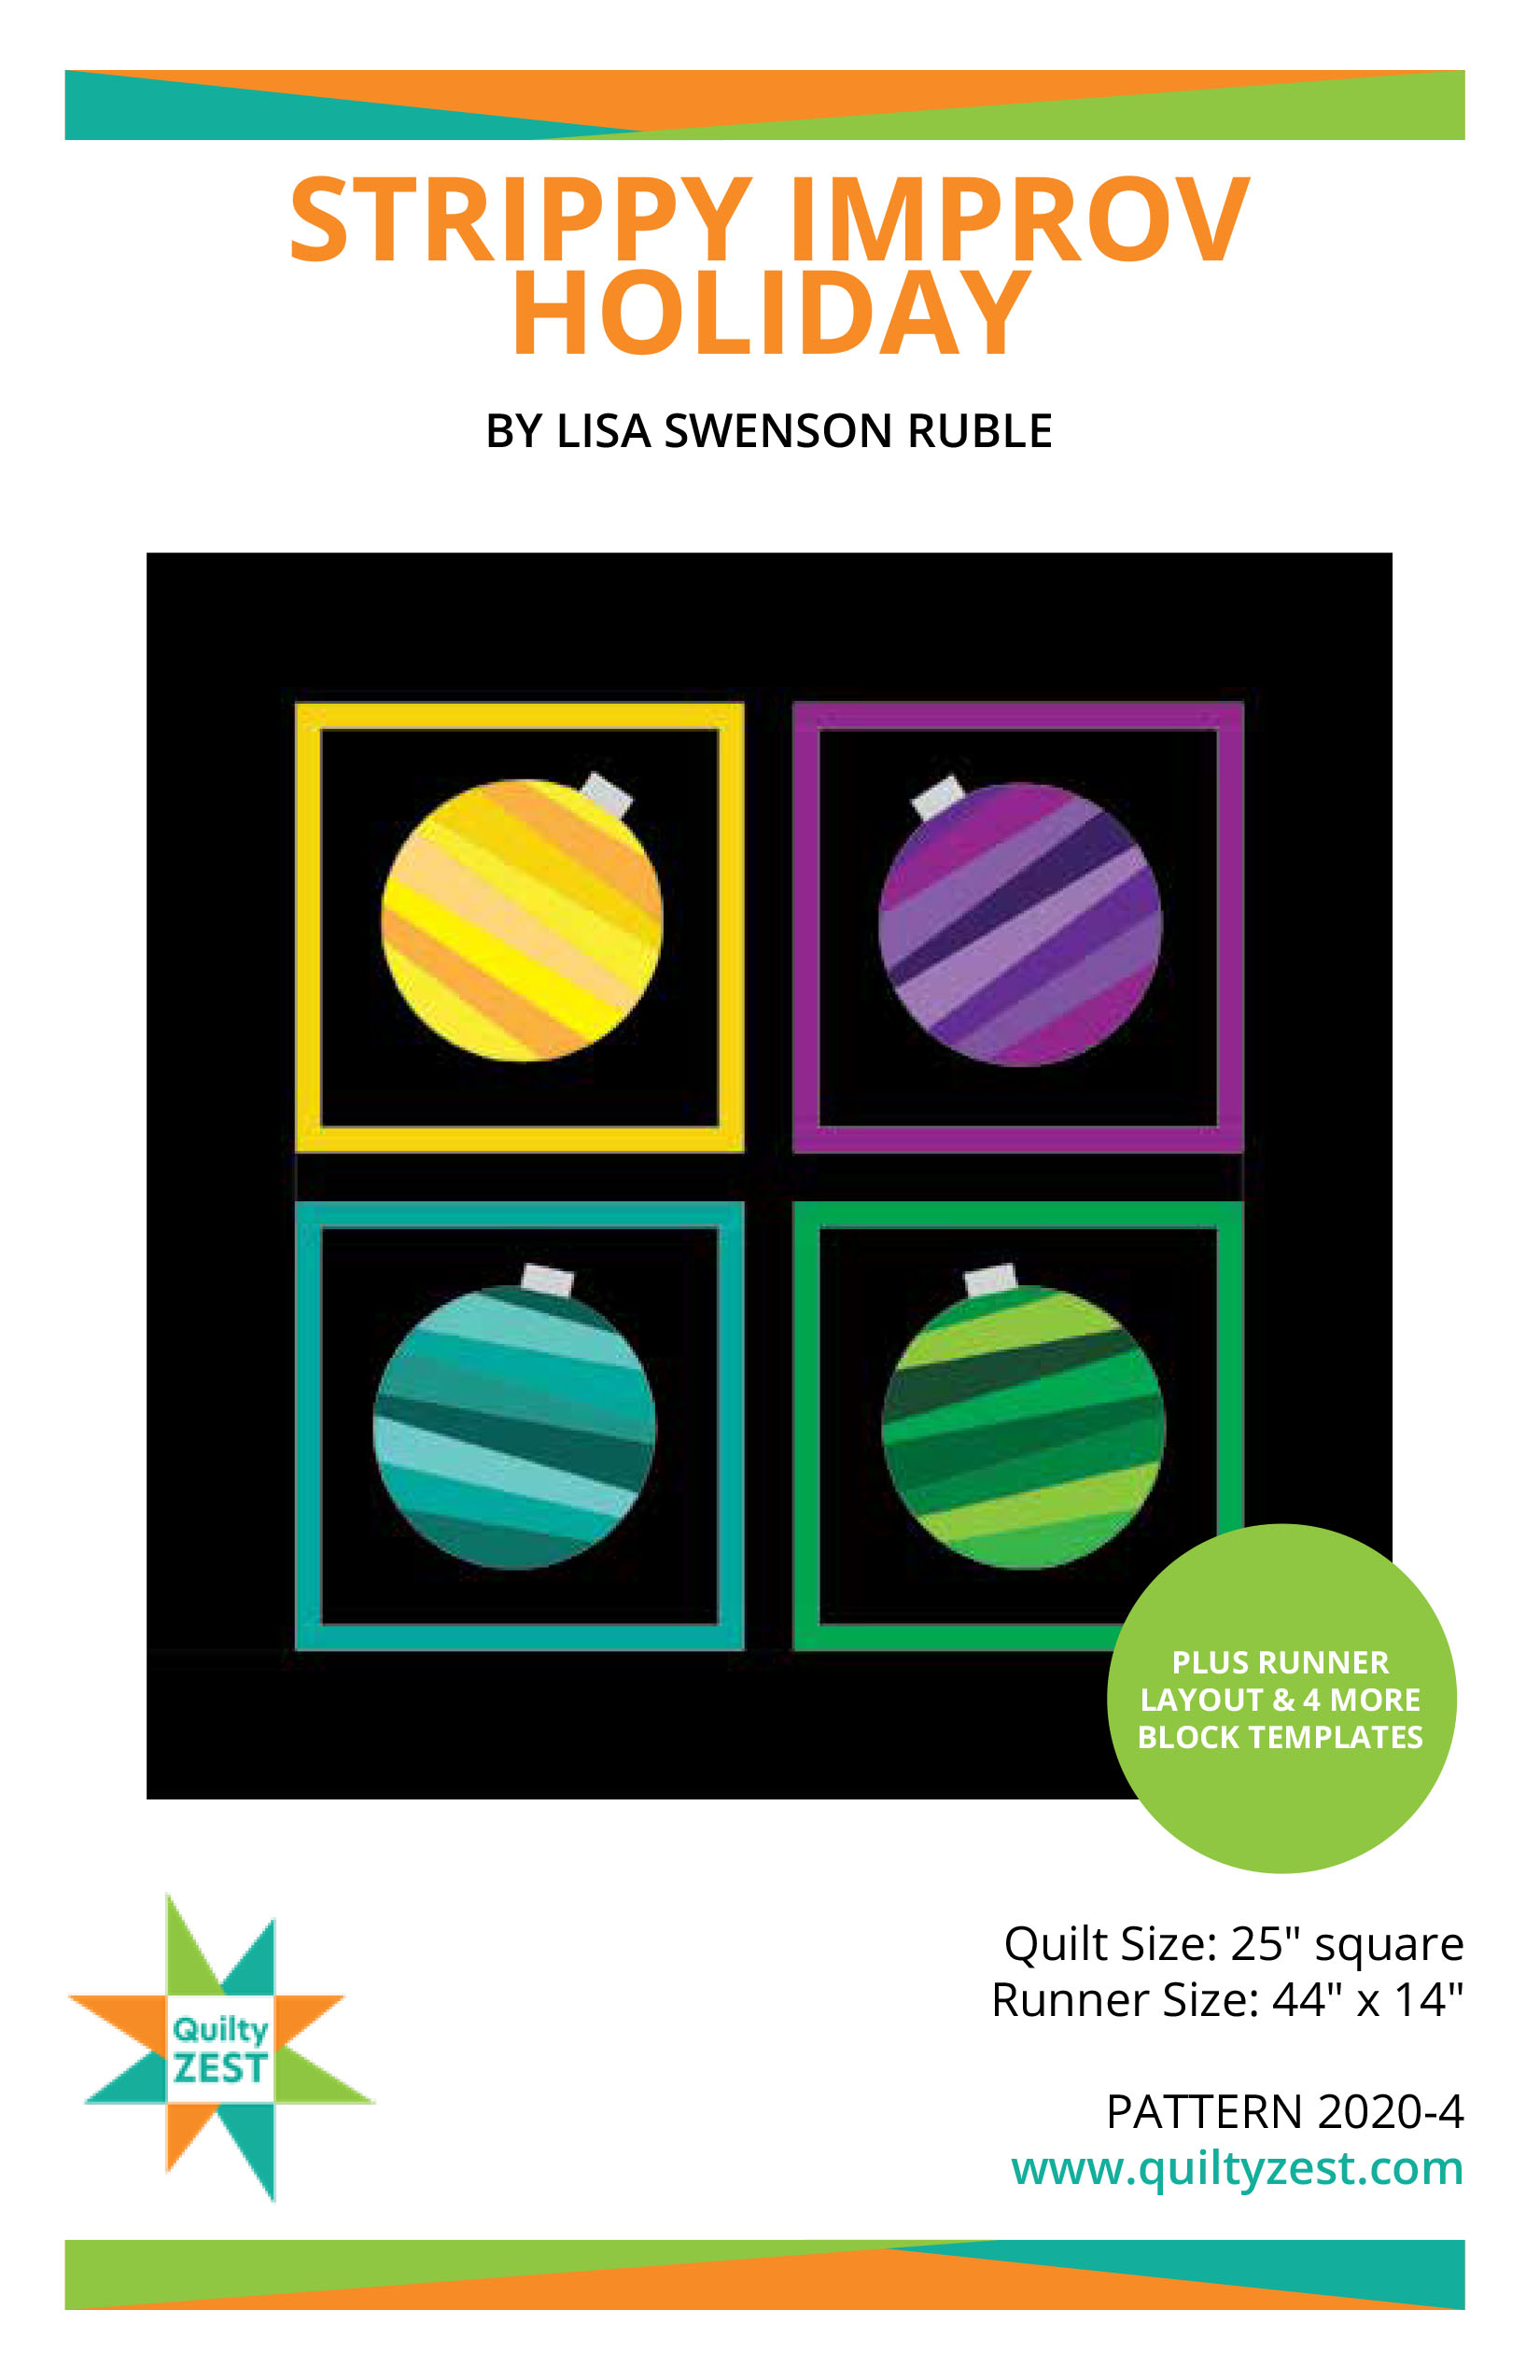
This wall hanging measures 25" square, perfect for a door or wall. The Strippy Improv Holiday pattern also includes directions for finishing four blocks into a table runner.

I had so much fun creating a very Christmas-y red, green and white wall hanging. Make sure to check out the rest of the stops on the Michael Miller Christmas Blog hop! Find the details here.


*************************************************************
Join the Strippy Improv Holiday Quilt Along!

QAL Details: 
Sew along with me to create a holiday wall quilt or table runner before Christmas! I'll post once a week with tips and advice (plus that all-important accountability!) to keep us on track. These blocks are addicting...just wait and see! 
Purchase the pattern here.
November 16th - QAL Kickoff - you're here!

Week 1: November 23rd - Fabric selection
Week 2: November 30th -  Making 2 blocks
Week 3: December 7th - Making 2 blocks
Week 4: December 14th - Assembly and Finishing
Purchase the pattern here.


Block choices:


See more Strippy Improv quilts here.
 **************************************************************************
If you're new here, welcome! I hope you'll stay and look around a bit. 
If you like what you've seen here, you can also find me:
To find all of my quilt patterns, visit my Etsy shop
Find me on IG here.
Sign up for my newsletter in the right-hand sidebar or here
(You'll receive a free pattern for my Diamond Drama quilt (below) as a thank you!)


Thursday, October 27, 2022

Strippy Improv Halloween Finishes!

I've had a flurry of sewing lately and wanted to share a few of my Strippy Improv Halloween finishes. 

I used these two jack o'lantern blocks 


...to make this pillow:


and this trick or treat bag! (scroll down for basic assembly instructions)


 I also finished my "Boo" table runner just in time to use it! Woo hoo!

How about you? Have you finished any Strippy Improv Halloween projects? I'd love to see them! Email me at lisaeruble (at) gmail.com or tag me on IG (@quiltyzest) and use the hashtag #strippyimprovhalloween

And if you don't have the pattern yet, you can get it in my Etsy shop.


Happy Halloween!

 **************************************************************************

Strippy Improv Halloween Trick or Treat Bag


By request, here are basic cutting details and instructions for making the trick or treat bag. I didn't take step by step photos because I was too busy filming the video! 

(See the video on IG: @quiltyzest)

You'll Need:
1 8-1/2" square strippy improv block

Orange tonal: 
(2) 1-1/2" x 8-1/2" strips
(2) 1-1/2" x 9-1/2" strips

White spiderweb:
(1) 13-1/2" x 15-1/2" piece for bag back
(2) 3" x 18" strips for handles
(2) 2-1/2" x 9-1/2" strips for bag front
(1) 2-1/2" x 13-1/2" strip for bag front
(1) 5" x 13-1/2" strips for bag front

Black print:
(2) 13-1/2" x 15-1/2" piece for bag lining
(2) 3" x 18" strips for handles

Assemble the Bag:
1. Sew orange tonal strips to sides and then top/bottom of 8-1/2" square strippy improv block.

2. Sew 2-1/2" x 9-1/2" white spiderweb strips to opposite sides of block. Sew 2-1/2" x 13-1/2" white spiderweb strip to top and 5" x 13-1/2" white spiderweb strip to bottom to complete bag front, measure 13-1/2" x 15-1/2". 

3. Layer bag front and bag back right sides together and stitch around sides and bottom. Layer (2) black print bag lining pieces right sides together and stitch around sides and bottom, leaving a 6" opening along bottom for turning. 

4. Cut out 2" squares from bottom corners of both outer bag and lining. Box corners. Turn outer bag right side out. 

5. To make handles, lay (1) each 3" x 18" white spiderweb and black print strip right sides together. Stitch along both long edges. Turn right side out, press, and topstitch along both long edges. Make (2) handles.

6. Measure in 2-1/2" from outer bag edges and pin handle in place, matching raw edges. Repeat on bag back. Baste handles in place. 

7. Slide outer bag inside lining, making sure handles are tucked in. Match side seams and pin top raw edges together. Sew along the top outer edge. 

8. Turn bag right side out through opening in the lining. Stitch the opening closed. Topstitch along the top edge of the bag to finish. Happy trick or treating!

 **************************************************************************
And one more last thing...
If you're new here, welcome! I hope you'll stay and look around a bit. 
If you like what you've seen here, you can also find me:
To find all of my quilt patterns, visit my Etsy shop
Find me on IG here.
Sign up for my newsletter in the right-hand sidebar or here
(You'll receive a free pattern for my Diamond Drama quilt (below) as a thank you!)

Thursday, October 6, 2022

Strippy Improv Halloween QAL - week 3

 It's week 3 of the Strippy Improv Halloween Quilt Along! 

How are your blocks coming along? 

If your life is anything like mine, the last couple weeks have sped by, and you can't believe it's already the second week of October. Halloween is coming!! 

I 'm still planning to finish some of my blocks into a table runner, and I'll show you that next week. 

But I also wanted a back-up plan - an idea for how to make a project from just one block in case time got short again. I chose to make two new pumpkin blocks, and I'm going to turn one into a throw pillow and one into a trick or treat bag. I'll share more details next week. 

Let's start with one more tip - this is about block background placement. Play around with your block background before fusing it down to make sure you get the best combination of fabric, and also to make sure things like the stems show through correctly. Here are two "don't do it this way" examples: 


The background needs to be adjusted up so the stem aligns with the green seam. 

The background needs to be adjusted down so the green doesn't show on the pumpkin. 

Play around with your background and make sure it's exactly how you want it before you fuse in place! 

*****************************************************

So back to my pumpkins - I decided they needed a little embellishment! When I stitched my pumpkin blocks, I wanted them to be jack o'lanterns instead. Aren't they adorable?!?! I just sketched my face shapes, but afterwards I created a pdf with similar faces to these for you to use. Download the pumpkin face templates here. Enjoy!

Since my pumpkin block has a black background, I knew I could use the fused pumpkin shape I cut out of the background for my eyes, nose and mouth. Easy! 


I love how those two bats look almost like accidental eyebrows! I didn't fare quite so well with the smile--the black bat in the right tooth makes it look like that tooth has a broken edge, which I've decided work for a jack o'lantern. But...pay attention to where you place your appliques! 
These are more of the Michael Miller Halloween and blender fabrics I used for my wall hanging above.


I also made a second pumpkin block, so I decided to try yellow eyes, nose and mouth so that this jack o'lantern looked like it was lit up. I like them both! 


If you add a face to your pumpkin, make sure to stitch down the appliques to secure them. Since you're fusing them to a pieced surface, they'll need those extra stitches. 

Next week, we'll talk about runner and wall hanging assembly (and the tote and pillow!). 

Until then, enjoy sewing your strippy improv blocks! 

Need the full Strippy Improv Halloween Pattern? Purchase the digital pattern here


 **************************************************************************
And one more last thing...
If you're new here, welcome! I hope you'll stay and look around a bit. 
If you like what you've seen here, you can also find me:
To find all of my quilt patterns, visit my Etsy shop
Find me on IG here.
Sign up for my newsletter in the right-hand sidebar or here
(You'll receive a free pattern for my Diamond Drama quilt (below) as a thank you!)