
Happy Monday! It's hard to believe school (and fall) are both right around the corner...
although we still have two weeks of summer vacation left here in Michigan!
I'm starting out the week with a tutorial as part of Windham's Lotta Jansdotter blog hop.

My oldest son is six and my youngest just turned one last week, so babies have been on my brain for, oh, about 7 years now. :)
When I saw the Stella fabrics by Lotta Jansdotter, I knew I wanted to make something baby related. I love the gray and citron addition to the basic blue and pink. Plus, some of the prints are corduroy! I decided to take advantage of the corduroy and make textured baby blocks. And, because toys are constantly spread out all over my house, I also made a "box" to store the blocks in. Both the box and blocks are super easy to make, and I think the box concept could have plenty of other uses, as well. Enjoy!
The fabrics: Stella by Lotta Jansdotter for Windham
(Those bottom four are corduroy!!)
(Those bottom four are corduroy!!)

You'll Need:
1/2 yard gray star corduroy (for outer box and blocks)
3 additional corduroy fat quarters (for blocks)
4 cotton fat quarters (1 for box lining, 1 for box binding, and 2 for blocks)
2/3 yard Pellon Flex-Foam
1 yard medium weight fusible interfacing
Fiberfill
Cutting:
From the gray star corduroy:
One 18" square
Four 4-1/2" squares
From each of the additional 3 corduroy fat quarters:
Four 4-1/2" squares
From 2 cotton fat quarters:
Four 4-1/2" squares
From the lining fat quarter:
One 18" square
From the binding fat quarter:
Two 2-3/4" x 21" strips
From the Flex-Foam:
One 18" square
From the fusible interfacing:
Twenty-four 4-1/2" squares
Making the Box:
Step 1: Layer the 18" Flex-Foam square on the wrong side of the 18" gray stars square and pin in place. Fold in half with right sides of corduroy touching and pin the sides. Sew both short sides using a 1/4" seam allowance.

Step 2: Cut 4-1/4" squares from the bottom (folded edge).

Step 3: Fold so the side seam touches the middle of the bottom on each side as shown and pin. Stitch with a 1/4" seam allowance to box the corners.

Step 4: Turn the outer box right side out. Repeat steps 1-3 using the 18" lining square (without Flex-Foam).
Step 5: Position the lining inside the outer box with wrong sides facing. Line up the raw edges along the top.
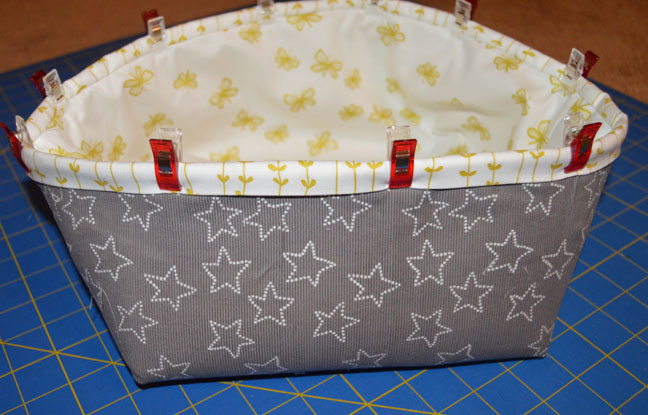
Step 6: Sew the two 2-3/4' x 21" binding strips short ends together. Prepare your binding and sew to the inside of the box (through all layers).

Step 7: Press the folded edge of the binding over the top edge of the box and pin or use Wonder Clips to secure. Topstitch the binding to the outside of the box. Your box is done!
Making the Blocks:
Step 1: Press interfacing to the wrong side of each 4-1/2" square.

Step 2: Sew four squares together in a row, starting and stopping 1/4" from the edge and then join the ends to make a "tube."
Step 3: Position a 4-1/2" square on top and pin to secure. Sew to the sides, pivoting at each corner to stitch along the next side.

Here's what your block should look like now:

Step 4: Pin the remaining square to the opposite end and stitch in place, leaving one side open.

Step 5: Turn block right side out, stuff with fiberfill, and slipstitch the opening closed. Make four blocks.
Tuck the blocks into the box and you're done! Babies will love the variety of texture the corduroy provides!


Windham is offering a giveaway of a bundle of the Stella collection! Visit the Windham Facebook page or blog and tell them you like these Stella fabrics. Then leave a comment below letting me know if you've ever sewed a baby gift for a chance to win the Stella bundle. Giveaway open through Thursday, August 27th at 11:59 pm EST.
Hi
ReplyDeleteI've sewed lots of baby gifts - mainly quilts with novelty fabrics but some that could also appeal to older children! Like you baby block box - could use it for other things for a baby too! Thanks for sharing!
These are on my list of to-dos for my new grandbaby due in Oct. Thanks for sharing. I've sewn many baby quilts, bibs, and burpcloths.
ReplyDeleteI always make baby quilts for baby gifts, but you may make me a convert to blocks. These are adorable! Thanks for the tutorial!
ReplyDeleteI've made lots of receiving blankets and recently a boppy cover. I would love to make a baby quilt with this fabric--I love the blocks.
ReplyDeleteI make lots of baby quilts for friends and charity. Thanks for the tutorial, these blocks are never as easy as it seems. You make it look simple.
ReplyDeleteI've made a number of baby gifts over the years. Love the soft blocks.
ReplyDeleteThe blocks are lots of fun for the babies. One of my favorite things is sewing for babies so I have definitely sewn lots of gifts for them. Thanks for the giveaway.
ReplyDeleteI have sewed recieving blankets and bibs and burp pads, but no toys. I love the basket and blocks. :)
ReplyDeletecraftyccain@gmail.com
I have made baby quilts to but not much else. I am looking forward to making some bibs though and these blocks look great.
ReplyDeleteHI,oh yes! I make charity Baby Quilts! And I've made a lot of them>yet still love doing them! Thanks for sharing! msstitcher1214@gmail.com
ReplyDeleteI've made several baby quilts but I've never made baby blocks!
ReplyDeleteI love them!
I have made baby quilts. I am going to start making the blocks and the box for additional gifts. Thank you for the tutorial and great idea adding the box.
ReplyDeleteI have made baby quilts. I am going to start making the blocks and the box for additional gifts. Thank you for the tutorial and great idea adding the box.
ReplyDeleteI have made baby quilts. I am going to start making the blocks and the box for additional gifts. Thank you for the tutorial and great idea adding the box.
ReplyDeleteI LOVE this! What a great idea to include a box to store these blocks. I have seen other block tutorials, but yours is much better than I have seen in the past and that box; love the box.
ReplyDeleteThank you.
I have sewn tons of baby gifts in the past. Nothing recently, but do need to get a few gifts done very soon. I have never made blocks like these however, and am sure I'll most likely be making these along with the other things I need to make.
I did comment on the Windham blog also.
What a fun tutorial! We have a just turning 5 months old Granbaby....I would definitely make these for him!! They are so cooool! Thank you for sharing! :)
ReplyDeleteI have made baby quilts often....but these blocks w/box are Unique!
I love how easy the box looks to make. Thanks for the tute. I like to make baby bibs and burp cloths.
ReplyDeleteI've made lots of baby gifts. Most recently: cute burp cloths for the gal at our local pharmacy who is having identical twin girls. I figured she'll need lots and lots of burp cloths: sometimes practical trumps precious.
ReplyDeleteI have made a few baby gifts, the latest a baby quilt. Thanks for the tutorial!
ReplyDeleteI have made a lot of baby quilts and burp cloths. I love your blocks and basket, thanks for the tutorial.
ReplyDeleteYess i have made 5 baby blankets this summer.....But your blocks are pretty cool might have to try that instead of blankets......
ReplyDeleteThank you Ellie for the tutorial. Your project turned out so cute with this pretty "Stella" fabric line. I have made baby quilts for nieces and nephews.
ReplyDeleteYes I've sewed a couple of baby gifts. A stuffed lamb, stuffed letters of the baby's name to hang like a garland, and a set of baby booties! The last ones were hand embroidered as well. I made six pairs and put them in a a natural wicker backet tied with an organic ribbon. Beautiful!
ReplyDeleteI have made baby gifts in the past. Usually the Amish puzzle ball.
ReplyDeleteI Make lots of baby gifts - I've done the blocks but didn't think to put them in a matching basket!
ReplyDeleteI just found your blog and have enjoyed looking around. Thank you for this tutorial. Decades ago I made baby blocks but I made them with four inch cubes of foam rubber, they were completely machine washable. I like yours better because baby can more easily grasp them. We now have a two month old grandchild and I will make her some blocks in a box like yours for Christmas. Thanks again!
ReplyDeleteSo cute!! I've got a Craft Gossip post scheduled for this afternoon that links to your tutorial: http://sewing.craftgossip.com/?p=84527 --Anne
ReplyDelete