Showing posts with label Sew We Quilt. Show all posts

Thursday, October 3, 2013

Time to Twist!

Today I'm part of the "Let's Twist to the 60s with Batiks" blog hop. I'm always happy to jump on the batik bandwagon--I love the colors, the richness, and the patterns of these dyed fabrics!

My quilt might actually be better described as "let's curve to the 60s"... was that a dance too?!

I've had the idea for this quilt for a while so the lure of batiks meant that this hop seemed like a great opportunity to try it out. I pulled out my brightest batiks, cut them into strips of various widths, and started piecing strip sets...

I joined pieced strips until I had sections that measured about 20" high. 

Then I used a curved ruler (the Leaves Galore Applique Template from Sue Pelland Designs) and started cutting. 

I originally planned to piece the curves together, but (shhh!) I got lazy at the last minute. I cut half of the strip sections into curves and simply layered them on top of the remaining sections. 

A little wavy line quilting and voila! Batiks that curve (and twist?)!

I can't end without thanking Madame Samm of Sew We Quilt and Mary of I Piece 2 Mary for being this hop's cheerleaders. And don't forget to visit today's other bloggers:


Color My World - you're here!


As a thank you for stopping by during the blog hop, I'm offering a giveaway from my batik stash (pieces are approximately fat eighths in size). To enter to win, leave a comment telling me your favorite 60s song. (Feel free to sign up to follow my blog, as well!) Mine would definitely be either a Beach Boys or Jan and Dean song--I may not have been born yet in the 60s, but I grew up listening to that music with my dad! The giveaway is open through Sunday, October 6th at 11:59 EST. On Monday, I'll choose a winner through random generator and post the name here on my blog. Good luck1


Friday, February 15, 2013

Kiss, Kiss, Love

I'm posting this from the midst of a slight chocolate hangover...February 15 should probably be an all-salad-all-the-time kind of day! Especially if in addition to too much chocolate, you also had homemade cannellonis filled with sausage, butternut squash, spinach and ricotta, and topped with a sage cream sauce. Yum! 

So on to the Hugs and Kisses Blog Hop, with thanks to Madame Samm of Sew We Quilt and Jane from Jane's Fabric and Quilts, our cheerleader. 

I designed my project with Valentine's Day in mind, but even with bright pink rick rack and prints like I chose, you can use it well beyond cupid's holiday.


It's a Tic Tac Toe (or if you like, Kiss, Kiss, Love) board.


I originally made the board with Xs and Os, but then decided to try out heart shapes instead of the Os, just for fun.


Do you want to be hearts or Xs? First one to get three in a row wins! :)

I included a double pocket on the back to store the game pieces.

If you'd like to make your own tic tac toe board, you can find the tutorial here on my blog.


Thanks so much for stopping by today! 
Be sure to check out the creative projects from the rest of today's bloggers! It's one last day of Valentine-y goodness!

p.s. I have to throw another two hugs-and-kisses themed photos in here of older projects.
First, my version of Tula Pink's LOVE quilt. Read more about it here.


Second, a small "lovey" made for my guild's charity project, which uses X and O blocks.  Read more about it here.

Thursday, January 31, 2013

Dare to Dresden


Welcome! Happy Thursday! Today is the last day of the Dare to Dresden blog hop over at Sew We Quilt. It's been so much fun seeing everyone's project over the past week while busily trying to finish my own. (Which I did, at noon on Wednesday!)
Thanks so much to the always enthusiastic and cheerful Christine from Quilt Monster in My Closet for being the hop cheerleader, and to Madame Samm for hosting all these great blog hops.

I purchased this bundle of batik fat quarters at Quilt Festival at least six years ago. 

The glow of the original project I had in mind had faded. So when the Dresden hop was announced, I knew these fabrics had found their purpose!


Keep reading the novel below to learn more about how this came together. 
To skip all that (I won't be offended...I know I'm long-winded!) and find the links for today's other participating blogs and to find out to enter my giveaway, scroll to the bottom.

 I didn't start with that exact idea. I knew I wanted to make a more modern Dresden. I start piecing strip sets, and cut blades from those as well as from plain fabric. Here was one of my first attempts. 
Just wasn't feelin' it.

I tried a *few* other variations. Still nothin' I loved.

 Ultimately, I came up with what you see here. Some of it was dumb luck. Like the fact that the orange sections butt up against each other in both areas. I just cut widths to make a strip set without doing math. What are the chances?! It's a happy accident that I like.

Monday night I pieced three of the quarter-circles. Then I unpieced the fourth quarter-circle that I'd pieced (badly) earlier. It's amazing what a difference a miniscule amount of error makes in a Dresden!

I pinned the completed Dresden to a square of Kona Tangerine (yum!), added backing, and quilted 1/4" on either side of the blade allowances. In the photo below, you can see the stitch lines through the center. I knew it wouldn't matter since I'd be covering it up with a center circle. 
But I really liked how the light blue thread looked on the orange. So I ultimately used that look to echo quilt the background. (Love the texture this creates!) I stitched on a bias binding to cover the outside raw edges of the Dresden, and made a circle using the interfacing technique for the inner circle. 

If I'd finished this quilt three days earlier or two days later, you'd see pristine white snow in the background. But it's been 50 degrees the last two days and all you see are brown leaves and mud. Good thing my quilt is so bright that the background scenery faces away!

Now here's my question: Would you bind it in orange or in navy? 
I couldn't decide so I haven't done it yet. 

And here's my giveaway: 
Leave me a comment telling me your vote: orange binding or navy?

 If you're not a follower, I'd love for you to consider becoming one (and let me know in your comment!). I will randomly choose one random comment and send that person this cute little quilt I made a few weeks ago (my first Dresden attempt...read more here!) and the six fat quarters below. 


The giveaway is open through Monday, February 4th at 11:59 EST.   

Thanks so much for stopping by! Make sure you check out all the other blogs posting today:
January 31th, 2013
Color My World --You're Here!


Wednesday, November 21, 2012

Take a walk down Holiday Lane...


Welcome to my blog! 
Today I'm participating in the Holiday Lane blog hop with the lovely Madame Samm at Sew We Quilt. Thanks to our super-organized cheerleader, Pauline from Quilt'n Queen and Jillily
Studio for the great pattern!

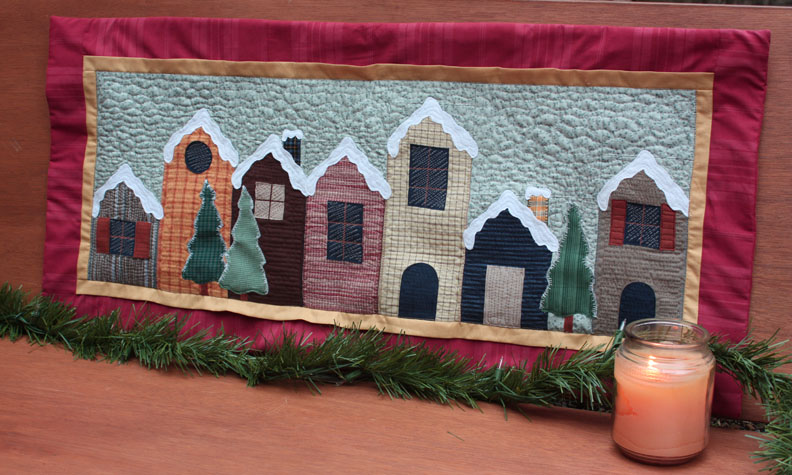
Here's a photo of my finished piece; keep reading to read how I'm obsessed with Christmas villages, why my project is flat rather than stuffed, and how to enter the giveaway I'm offering.


When I first saw this blog hop, I knew I needed to be a part of it. My actual (porcelain) Christmas village spans a banquet table each December, complete with little evergreens, a mini nativity scene, and battery-powered street lamps. My high school boyfriend (who had his own collection!) got me started 17 years ago, and I've added to my village pretty much every year since. My favorite piece? A church that plays Silent Night that used to belong to my grandpa. 

My first fabric village was this nativity scene, which I recreated from a Christmas card my family received while I was in college. 
I sort of made this up as I went along, using fusible web and a lot of embroidery floss. I didn't know as much about sewing, and I made the border (cropped out here) out of batting. Hee hee. I just liked the texture...
This pillow still sits on my mom's couch every Christmas season. 

But back to Holiday Lane. You can see now why I wanted to be part of this blog hop. 
I also knew exactly what fabrics I wanted to use: a collection of homespuns and flannels that I'd been hoarding. My style isn't very "country," but there's something about a Christmas village 
that simply begs for homespuns and plaids.

Here are the options I started with: 

I auditioned my fabrics and chose the following:

Here it is pieced and appliqued, ready for some stitching embellishment. 
As I stitched, I decided some of the houses needed extra detail, so I added a few more windows 
and doors. 

Take a look at some of the stitching details up close:
I used some of the fancy stitches on my Janome to buttonhole stitch the outside edges of each house, and a cool icicle-looking stitch on the pine trees. The rest of the stitching was free motion quilting.
 Wavy lines through the snowy roofs, light gray zigzags creating "glare" in the windows,
Windowpanes on the windows, and back and forth stitching on the houses and doors.

Here it is as a pillow:
I made an envelope-style pillow and then a muslin pillow form. The muslin pillow form is too fat; you can't see all the houses. So until I redo that, the "pillow" is a wall hanging!

When I fix the pillow form, I think I'll also add some quilting lines into the red border, as it's too floppy and wrinkly compared to the rest of the piece. 

So there's my story! Time to get my Christmas village out to match my pillow...

Now that you've visited me, make sure to check out the other blog hop participants today. I can't wait to see what other quilters did with this pattern!

Wednesday November 21

What's left? How about the giveaway!?!?
This charm square pack of Kate Spain's Flurry collection for Moda could be yours. Just in time for a last-minute holiday project! 

To enter:
1. Sign up as a follower or to follow my blog by email in the right hand sidebar, and then leave a comment to let me know you did so. (If you're already following, thanks! You're the best! Leave a comment here letting me know that.)
2. For a second entry, click here and like my Facebook page, and then leave a comment here letting me know you did so. 
3. Today is my birthday. So just for fun, in your comment for #1 and/or #2, tell me your favorite kind of birthday cake. I made myself pumpkin Kahlua cheesecake on Sunday. Yum! (And yes, I make my own birthday cake. I enjoy baking; my husband doesn't. I get what I want, which is not a store-bought cake, so I'm happy, which means he's happy too. Win-win!)
4. The giveaway will be open until 11:59 EST on Sunday, November 25. I'll use random number generator to select a winner from the comments on November 26. Check back on the 26th to see if you won!

Thursday, September 20, 2012

Gone Dotty!


I am lucky to be one of the blogs posting on the LAST day of Sew We Quilt's Dots on Dots blog hop. Thanks so much to the fearless leader of this blog hop and many others, Madame Samm, and the cheerleader/hostess, Corrie of QuiltTaffy--it's been so much fun following along and seeing everyone's dotted creations!

Be sure to scroll down to the bottom of this post to enter the giveaway!
The giveaway is now closed. Thank you for visiting!

My initial thought was to do bowtie blocks. It seemed a perfect fit for polka dot fabrics! I made this small quilt using dotted fabric from my stash and a white-on-white circle print. I quilted it 1/4" from each horizontal and vertical seam line. I love how this turned out, but since I'd wanted to do a quilt made of small blocks, I really wasn't following the rules about block size for the hop.

So I went back to my stash again and came up with this:
It is very bright and cheery. And hurts the eyes a little bit, I think! 

Log cabins (both wonky and traditional) are my go-to block. They're easy, they're fun, and pretty much any fabric looks great in the pattern. 
Every fabric in the quilt, except for the sashing, is from my stash. And I still have enough dotted fabric left to make two more quilts this size, easily. Scary! :) 

Here's a close-up of one my favorite blocks:


Here you can see my sashing audition. I wanted a black and white dot fabric and could only find this optical illusion print. I bought 1 yard and decided I'd make it work, because the blocks definitely needed something DARK to separate them. A place to rest the eyes between each bright block. 
I decided that I preferred the uniform smaller dot size for the sashing, so I fussy cut sashing rows and reserved the fussy-cut larger dot strips for the outer border. 

Here it is with the outer border, which provides a good frame. 
I won't even try to claim that the outer border offers an opportunity to rest the eyes! :)

After I machine quilt this, I'm going to send it off to Margaret's Hope Chest. I hope it will make someone in need happy and warm!


If you're not going dotty yet, here's one more dotted quilt, a top that I made earlier this summer. 
 Read more about it here.

Thanks so much for stopping by to see my dot-filled projects! Make sure to visit the other blogs showing off projects today:

*The full schedule for the dots on dots blog hop can be found by clicking here.

Oh yes, and the GIVEAWAY!!!

I am giving away my little bowtie mini quilt AND a charm pack of Amy Butler's Spots (seemed appropriate to the theme, right?)


To enter, simply leave me a comment telling me your favorite color. 
*Note: You must be a follower to win, so if you are not yet a follower, 
please join first and then leave a comment.* 
The giveaway is open through Monday, September 24th at 5 pm EST. 
The giveaway is now closed.
I will use random number generator to select a winner that evening 
and post the winner's name by Tuesday morning. Good luck!

p.s. Linking up with Confessions of a Fabric Addicts "Can I get a whoop whoop" and Quilt Story's "Fabric Tuesday" to share the dotted love!