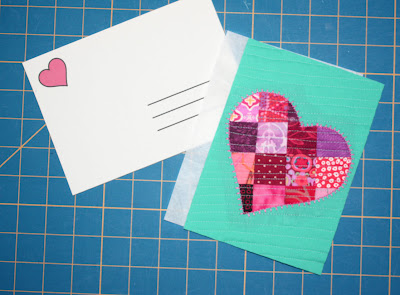
Every year I start thinking about fun projects to do for Valentine's Day on about February 11th. This year I started earlier...a whole week! (Well, I made the project about 2 weeks ago, but it took me a while to put the tutorial together.)
Mail some fabric love out this Valentine's Day. I love the idea of fabric postcards. You can actually mail them, and I think they'd be such a neat surprise to receive in the mail! (In fact, let me give you my mailing address...!)
I have two versions here. One uses basic fusible applique, and the other gets a little fancier.
Triple Heart Postcard
Hint: The fabric really makes the project here. I love this striped batik I had in my stash.
You'll need:
6'' square of pink fabric
4'' square of coordinating fabric
6'' x 8'' rectangle of background fabric
10'' square piece Pellon® 805 Wonder-Under®
5'' x 7'' rectangle of Pellon® 40 stabilizer
6'' x 8'' rectangle of batting
8-1/2'' x 11'' fabric sheet for inkjet printer
To make the triple heart postcard:
1. Print all three heart templates. (Click
here to download the template pdf.)
2. Trace one of each size heart template onto the paper side
of the Wonder-Under®. Cut out roughly around traced shape.
3. Lay the Wonder-Under® large heart template piece on the
wrong side of the 6'' pink fabric square. Lay the Wonder-Under® small and
medium heart template pieces on the wrong side of the 4'' square of
coordinating fabric.
4. Fuse the Wonder-Under® template pieces to the fabric
scraps. Let cool. Cut out each shape, peel the paper away from the fabric and
set aside. I like to loosen the edge of the
paper before cutting the shape to avoid potential fraying as you separate the
layers.
5. Position all three heart shapes on the 6'' x 8''
background rectangle. I angled them and overlapped two of the hearts. The background fabric will be trimmed after
quilting, so keep pieces away from fabric edge.
6. Fuse the hearts in place following the manufacturer's
instructions. Let cool.
7. Layer postcard top with batting and baste with pins.
8. Applique the hearts to secure using a zigzag, buttonhole,
or other decorative stitch. I used my new favorite zigzag variation and black thread, so that the stitching looked like it blended into my background fabric.
9. Quilt the background as desired.
10. Trim postcard front to measure 5'' x 7''.
11. Scroll down to the Assembly directions under the patchwork postcard. Both designs are assembled the same way.
Patchwork Postcard
You'll need:
Twenty 1-1/2'' squares of assorted red and pink prints
6'' x 8'' rectangle of background fabric
10'' square piece Pellon® 805 Wonder-Under®
5'' x 7'' rectangle of Pellon® 40 stabilizer
6'' x 8'' rectangle of batting
8.5'' x 11'' fabric sheet for inkjet printer
To make the patchwork postcard:
1. Arrange the twenty 1-1/2'' red and pink print squares
into four rows of five squares each. Sew the squares into rows and join the
rows.
(Have you noticed how much smaller the margin of error is when you're sewing tiny pieces?!?!)
2. Print large heart template. (Click
here to download the template pdf.)
3. Trace the heart template onto the paper side of the
Wonder-Under®.
4. Cut around the outside of the heart shape ½'' past the
drawn line. Cut around the inside of the heart shape ¼'' inside the line. Position on the background fabric,
centered from top to bottom and tilted slightly to one side, and fuse in place.
Let cool.
5. Cut out along the line on the inside of the heart, creating a negative space heart shape.
Peel the paper away from the fabric and set aside. Again, I like to loosen
the edge of the paper before cutting the shape to avoid fraying problems.
6. Position this negative space heart shape fusible side
down onto the red/pink patchwork. Rotate as desired to show preferred patchwork
areas and/or tilt the angle of the patchwork that shows through.
7. Fuse the background fabric in place following the
manufacturer's instructions. Let cool.
8. Applique the heart edge to secure using a zigzag,
buttonhole, or other decorative stitch. Turn over and trim excess patchwork
fabric.
9. Layer postcard top with batting and baste with pins.
10. Quilt the background as desired.
A quick word about quilting thread color here. I auditioned several different colors--a pink/red, a gray (thinking neutral) and the light aqua I ended up using. I was worried the aqua would stand out too much on the pink/red patchwork, but that was much less obvious than the way the other colors stood out on the aqua!
11. Trim postcard front to measure 5'' x 7''.
Assembly (for either postcard)
1. Print the postcard back pdf (click
here to download pdf) onto the fabric side of a
fabric sheet. Cut out one postcard back just inside the lines. Remove the paper
backing.
2. Layer the postcard right side down, 5'' x 7'' stabilizer
rectangle, and quilted postcard right side up. Pin layers together.
3. Using a dense zigzag, stitch around the entire outer edge
of postcard.
4. Use a fabric pen to write a note and either mail or
deliver to a friend!
I hope you enjoyed this tutorial! I had a brainstorm this weekend and am working on a second Valentine's Day-themed tutorial, so come back soon!


