Showing posts with label machine quilting. Show all posts

Thursday, December 16, 2021

Strippy Improv Holiday Sew Along Part 8


If you're looking longingly at the Strippy Improv Holiday blocks but thinking that there's no way you have time to sew a wall hanging or table runner before Christmas, this post is for you!

 If you're just joining in, this is a very loose sew along--see the schedule at the bottom of this post--I'm making four different blocks and then talking about assembly. 

Totally do-able before Christmas! Especially after you read today's post!

Need the pattern? Find it here.

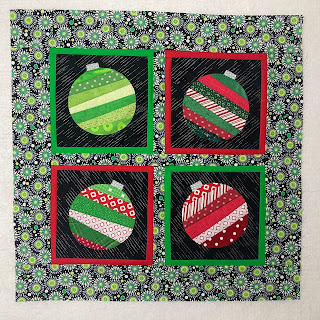
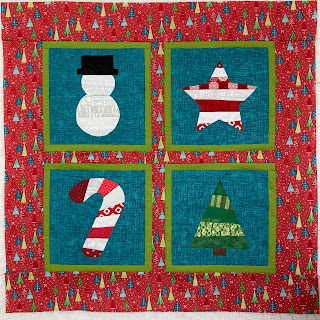
I've got two wall hangings to quilt. I finished this top earlier this week--still with a week to go before Christmas! 
The question I'm most commonly asked about quilting is what color thread to use, particularly for an allover design. Which can be tricky with a variety of colors, like in the block below. My best advice? Audition your thread colors by stretching them across the quilt. You might just be surprised what colors work. 
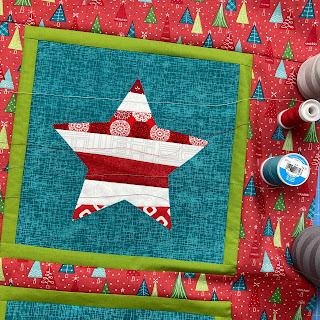

I tried light grey (better than white because it's not so bright), red, teal, and medium gray. Even on the white, I actually like the teal alot! Like I said, you might be surprised!
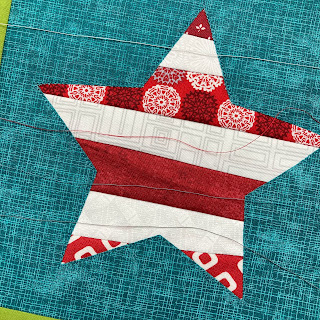

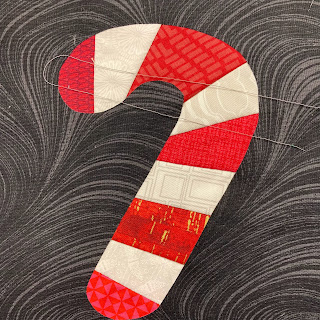
I tried light gray on this candy cane block--blends in with both the dark gray background and the candy cane itself.


Of course, you can always quilt the different sections separately. I think I will do that with this wall hanging rather than trying to choose a single thread color.

I took a pic of the back of my finished runner, so you could see the quilting. I opened not to quilt the ornaments themselves, but instead quilted the block background, the block frames, and the sashing/borders. Lots of options!
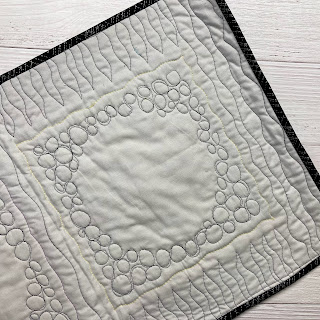

How will you quilt your project? 

These blocks stitch up so quickly - you still have time to make something before the holidays! The pattern comes with templates for five different blocks (ornament, snowman, tree, star and candy cane), as well as two layout options--a four-patch style wall hanging and a table runner.

Purchase the pattern here.


See you back here Thursday for some finishing tips - including the most frequently asked question--what thread color should I use for quilting?

Strippy Improv Holiday Sew Along Schedule:
Thursday, November 18th - Intro and Fabric Selection

Tuesday, November 23rd - Make a block

Tuesday, November 30th - Make a block

Thursday, December 2nd - Make a block

Tuesday, December 7th - Make a block

Thursday, December 9th - Assembly

Tuesday, December 14th - Alternate options

Thursday, December 16th - Finishing

********************************************************************

If you're new here, welcome! I hope you'll stay and look around a bit. 
If you like what you've seen here, you can also find me:
To find all of my quilt patterns, visit my Etsy shop. 
Find me on IG here.
Find me on Facebook here.
Sign up for my newsletter in the right-hand sidebar or here. 
(You'll receive a free pattern for my Diamond Drama quilt (below) as a thank you!)

Tuesday, December 8, 2020

Machine Quilting: Knowing My Limits

 Today's prompt for the 31 Day Blog Writing Challenge is Skills I Wish I had. Since time travel and the ability to clone myself seem a little far fetched, I'm going to go with machine quilting. 

The smaller the quilt and the simpler the design, the better I do. I have aspirations of fancy swirls and point-perfect echo quilting, and sometimes even perfectly straight lines, but for the moment I tailor my quilting plans to designs I think I can successfully achieve. 

Hello, stipple, straight lines, and curvy lines. :) 


It is fun to branch out and practice, particularly on smaller quilts that are easier to maneuver. 

Here are a few of my quilting highlights:

Lots of logs on Echo:

And on ZuZu Squares:


And Rainbow Star Crossing:


Do you see a theme? Confined spaces, mostly strips. I need boundaries!


I also spend plenty of time admiring other people's quilting skills and if I want a quilt to look really fabulous, I send it to Diane, my machine quilter. :) 

She quilted by first Wonk Around the Block quilt: 
I love the swirls she put in the background of my wonky star center.

And all the different details here:

And ZuZu Squares:

And the rainbow version of Opposite Directions. Simple straight lines, but stunning! (and way straighter than mine would have been!)

I'm getting ready to quilt a new version of Wonk Around the Block. Any suggestions on how I should quilt it? Let me know in the comments.


If you like what you've seen here, you can also find me:
To find all of my quilt patterns, visit my Etsy shop. 
Find me on IG here.
Find me on Facebook here.
Sign up for my newsletter in the right-hand sidebar.

Thursday, April 9, 2020

Star Crossing QAL: Week 5

Welcome to Week 5 of the Star Crossing QAL!

It's time to quilt!
The best part about assembling this quilt is how FAST it goes together. And if you're not to this step yet, no worries--you have time to catch up. 
 There's even still time to get started. 

If you still need to purchase the pattern, you can find it here.

Week 5: Machine Quilting
I love being able to photograph a finished top, but then comes the big question...how will I quilt this? If I'm machine quilting a quilt myself, part of that answer includes balancing what I'd like to do with what I'm actually capable of doing! 

First, basting: How do you prefer to baste? I used to be a dedicated pin baster. Then I switched to spray baste, but still on the floor, taping the backing down and working through the layers. After watching a video from Christa Quilts, I've switched to basting on my large ironing board. 


Let's walk through a few machine quilting options:

Option 1: Straight line quilting! For my first Star Crossing quilt, I went with straight line quilting using my walking foot. I don't mark lines, beyond the first one. I just use the walking foot width (or if I want it wider, that handy little L-shaped tool that came with my sewing machine--anyone know what it's called?). I chose diagonal lines to emphasize the diagonal flow of the stars. 


Option 2: Free motion quilting! For my second Star Crossing quilt, I had more time, so I free motion quilted it, using different designs in different areas. I find it easier to do on a smaller quilt like this one rather than a lap-sized quilt because gravity doesn't factor in quite so much, pulling on the quilt as I move it. 

Psst...do you love the mini rainbow backing fabric as much as I do?
 I quilted a square spiral in the center using my walking foot:


I "traced" the rainbows in the star block centers and did some back and forth lines in the star points (and an easier "outline" in the background of the small stars):


I did a lot of each quilting for the background, providing texture in the solid white. The part I'm most proud of is the outer border--I did diagonal lines and tried something new--changing directions partway through each side. I'm really happy with how it turned out!


And option 3: Outsource it! If you'd prefer not to tackle the machine quilting yourself, then I'd recommend taking advantage of the deal from Piece, Love and Quilting: 

Pam and Diane, the lovely ladies at Piece, Love and Quilting, are offering a special deal to QAL participants:
25% off computerized edge to edge long arm quilting 
(including batting) for Star Crossing quilts

Contact them via FB or IG to take advantage of this discount!


I can't wait to see what you decide! 
I put two weeks on the QAL calendar for machine quilting--let's compare notes then! 

************************************************************************************
Quilt Along schedule:
March 12: Fabric selection
March 18: Cutting
March 25: Small and medium stars
April 2: Center star and assembly
April 9: Machine quilting
April 22: Binding


The downloadable version of the Star Crossing pattern is on sale in my Etsy shop, so grab your copy today!

Purchase the pattern (currently 20% off!) here.

*Bring a friend deal: Get a friend to sign up for the QAL and purchase the pattern, and you'll receive 20% off an additional pattern of your choice! 
Simply email me your friend's name and I'll email you the coupon.

************************************************************************************

Over the Rainbow fabrics
If you'd like to use the same fabrics, here are some shops carrying them (please contact me if you know of any others and I'll add them in!):

Thursday, January 31, 2019

OMG: That's A Swirl

I completed my January One Monthly Goal and even had one day to spare! 

I designed this quilt about 18 months ago. I convinced my mom to make it for me--so much cutting!! 
She pieced it and then it sat in my "to be quilted" pile for too long. Now it's done!


Here's a close-up of the quilting. Because it's raw edge applique, I wanted to close as close to the edges as I could, without doing something like a zig zag stitch. That would be a lot of zig zagging! 

For the swirls themselves, I followed the swirl pattern with free motion quilting--which is why the lines aren't anywhere near perfect! For the background, I used pebbles. The quilting obviously shows up more on the white than the prints. 

Now to write the pattern...


Tuesday, October 16, 2012

Baby Quilt Speed Record!

Courtesy of a rainy weekend (and a nicely small-sized baby quilt), all I have left to do is bind my friend's baby quilt. (Well, unless you think otherwise...keep reading.)

My plan for quilting this little guy was just simple straight lines 1/4" on either side of the block seams. Which I like. But now that that part's done, do I just revel and relax in its simplicity, or does it need something more? Here's a close-up photo of the front.


Believe me when I say that 95% of me wants to hogtie the other 5% of me that keeps suggesting some sort of filler pattern for the squares. All those starts and stops. So much room for error on a quilt that I want to be as perfect as possible because it's for a dear friend. I know the best way to be a better machine quilter is to practice, but this is not really the quilt I want to practice on! And I do love the simplicity of what I've got.

So I'm waffling.
Please tell me what you think. I also had considered quilting straight horizontal and vertical lines as well, but the strips on the back are not exactly straight, and quilting parallel to them would only draw attention.

Here are some additional photos of the front and back. After three days of non-stop rain, I really shouldn't be complaining about the sun being "too bright." So I won't. I'll let the photos do the talking. An attempt in the sun, in attempt in the shade, and the best attempt being in the sunroom, complete with it's lack of attractive background/outdoor setting for my photos. But at least the colors are fairly accurate!


Thursday, June 28, 2012

100 followers & 1 Placemat

I'm thrilled to have hit the century mark for followers! I'm digging around in my fabric to find a good giveaway to celebrate, so check back in the next couple days to see what I can bear to part with find. Thanks so much to followers old and new!

Here's what I've been playing with lately: Placemats.
Why? First, they're quick and can be finished quickly My UFO list is piling up to obscene heights. Second, it lets me practice some small-scale machine quilting, something I badly need to do. (see evidence below)

It all started when I saw this pillow on the clearance rack at Target.

It caught my eye, and when it was still there on my third trip during a two-week period, I took it as a sign and snapped a quick photo. Small segue: Somehow I made it to Target three times in two weeks WITHOUT any kids. That's almost unheard of. And heavenly.

Using the design as inspiration, I pulled all kinds of large florals from my stash, went solid fabric shopping again, and found a shape I liked in my clip art book.

I mocked up a small and large design versions in Illustrator.

Then I moved to fabric. Here's what I made first:
 I really thought I'd like the ultra plain placemat--besides topstitching around the edge, the only stitching is a little raw edge applique around the motifs. But it actually seemed kind of boring.

So I added a little free motion quilting, just following the "grid" of the shapes.

At this point I knew that this particular placemat was not going to be a finished product, because I'd prefer to quilt just the top and then add the backing, pillowcase-style, so I decided to play a bit, experimenting with different stitches and seeing if I liked anything.

Notice that I'm showing you the full shot first, where it's hard to see detail. Go ahead and ooh and ahh now, because the close-ups below won't spare you the gory details.

But first, a few things about free motion machine quilting:
1. I picked the absolute worst fabric and pattern to start practicing on--wide open space with no boundaries to help me contain the quilting, and a solid color that hides nothing(!) in terms of mistakes.
2. When I was in high school, I used to umpire middle school girls' softball games. Let's just say that split-second decision making is not a skill of mine. When I called balls and strikes, about 50% of the time I regretted the call I had just made. Machine quilting is not so different. I'd made a decision (turn here!) and then two stitches after turning, decide I should have gone the other way.
3. For me, machine quilting is grind your teeth, tense your shoulders stressful. I think I need to work on changing this mindset almost as much as I do the quilting stitches.
4. All that aside, I fell in love with this book:
I want to BE Angela when I grow up. I LOVE her quilting, and really enjoyed trying out many of her stitches. If you haven't seen this book yet, definitely check it out.

Ignore my fluctuating stitch length, my herky-jerky curves, and other messiness, and take a peek at these close-ups. Because while I know I have a lot to learn, I really enjoyed the process the finished results and I can't wait to practice some more.

Swirls and a meander

Upper left: Circles (I had the most trouble with this one); back and forth (top center), paisley attempts (lower left) and just a wavy grid (lower right)

Modern clamshell (one of my favorites!) and a random grid

Here's my question--how should I quilt these placemats? One of the designs you see here? Straight or wavy-straight lines before I add the appliques? I'd love to hear what you think because I can't decide!


p.s. Linking up to "Can I get a whoop whoop?" over at Confessions of a Fabric Addict!