Showing posts with label fat quarters. Show all posts

Tuesday, May 8, 2012

Strippin' Dot Blocks

I've been very busy procrastinating the quilting of my wonky log cabins, so I've got another piecing project in the works, besides the fabric I showed a sneak peek of on Friday.

About six years ago, I bought a fat quarter bundle of tonal dotted prints at Quilt Festival in Chicago. I've used about half of them in various projects, but still had about 10 to choose from, and I knew I wanted to use a bunch of them in one project. Then last week, while reading up on straight line quilting, an idea for a super simple quilt block popped into my head. Combine those two ideas, and voila! strippin' dot blocks* were born.
Here is a sampling of the blocks I have finished so far:

And here's how to make them:

I cut each fat quarter (I'm using 6) into twenty 4" x 4-1/4" pieces. I chose this size because the 4" square maximized the fat quarter fabric. More about the extra 1/4" later.
 I cut white solid into 1" x 5" pieces. 


To make a block, position a square so the 4-1/4" measurements are on the left and right sides. Position a ruler across the square as shown, on any angle you like. Cut the square into two pieces.


Lay a 1" x 5" white piece along one diagonal edge and stitch. Press open.


Position the diagonal edge of the other "half" of the square along the remaining white edge. Always double check that you have this second piece oriented correctly to make a "square" when it is stitched and pressed. Try to position this second piece so that it is relatively in line with the first piece, but eyeballing is fine. You'll be trimming anyway. Stitch and press open.


Using a square, trim the block on all four sides. I trimmed mine to measure 3-3/4" square. So here's where the explanation of the extra 1/4" in the original square comes in--because you're adding 1/2" of white fabric to the width of your block, you're making it wider. So by cutting a taller square to begin, you're finished, pieced shape is more square-like, giving you greater flexibility for trimming. But, if you choose to just go with 4" squares for simplicity's sake, or if like me, you screw up and cut some of yours in the wrong direction, it doesn't really matter. That's the beauty of trimming!

And here's a finished block:

These blocks have only two seams, so they sew up quickly! I have 108 total to make, and I have 20 done in about an hour's time. I even started chain piecing them, though if you do so, I recommend chain piecing just one of each color at a time. That way you won't have to worry about if you are matching up the same angled piece to finish your block!

Here is what I'm thinking as far as a rough layout goes, using white sashing and turning some of the blocks, but it'll be fun to play with it for real once I have all the blocks complete and can put it up on my design wall.
Bright and summery, isn't it?
:)

I'm also posting this today over at Quilt Story for their Fabric Tuesday.

*I also have it in my head that these look like nautical flags, but google didn't agree. The red one definitely looks like a scuba flag and that's about it, but I can't get the nautical flag thought out of my head!


Monday, April 23, 2012

This Nursery's a Zoo! Quilt Tutorial, part 2

This is the second post in my nursery quilt tutorial. For the first post, click here.

It's time to make the appliqué blocks!
You'll see several tips scattered throughout this section. Let's just say that most of them were born of mistakes I made during my first few appliqué projects!


Making the Appliqué Blocks
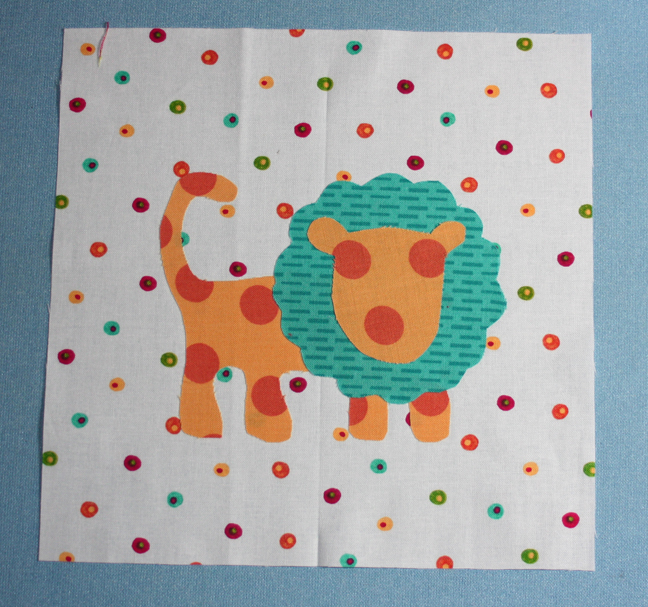
1. Print out the templates (click for the liongiraffe and elephant patterns) and trace onto the paper side of fusible web. Cut out around each animal shape, leaving approximately 1/2'' past the drawn line. 

Pair up your fabrics for each animal block. Once you've decided what fabric to use for which animal parts, follow the manufacturer's directions and press fusible web to the back of the appropriate fabrics. 


Tip: Position your animal shapes carefully to keep (or avoid) certain elements in the fabric. Cut out each shape on the drawn line.

2. Fold and lightly press each 8'' background square in half in both directions to find the center point. Use this point as a guide for centering the animals on the background square.


3. Remove the paper backing from the fusible web. Tip: I sometimes have trouble with this, so whenever possible, I choose an initial separation point that will be covered by another appliqué element.
4. Press the shapes to the background square. I prefer to press one shape at a time, beginning with the base layer (so, first the lion body, then the mane, and then the face).


5. If desired, press lightweight interfacing to the back of the square to serve as a stabilizer, making sure it goes beyond the area the appliqué covers. Tip: Even though I use fusible interfacing, I still pin the corners because I've had the interfacing ''unstick'' before, which just makes a mess when it doubles up as you're stitching.
6. Choose a coordinating or contrasting thread color (or colors!) for zig zag stitching the appliqués in place. I chose turquoise because I knew it would tie in nicely with my sashing fabric. 

Choose a stitch length and width. Tip: Audition the stitch size on scraps first. I like to choose a happy medium because it's more forgiving of my stitching errors. Stitch the animal pieces on each block and press.

If you used a stabilizer, trim the interfacing around the stitching.


Assembling the Quilt
Note: My sample only has two blocks rows and three sashing rows because I'm making a smaller wall hanging. You will have four block rows and five sashing rows.
1. Lay out the blocks in four rows of three blocks each, alternating the pieced and appliqué blocks in each row. Add four 2-1/2'' x 8'' sashing strips to each row, alternating with the blocks. Sew the sashing strips and blocks together in each row to make a block row.


2. Lay out three 2-1/2'' x 8'' sashing strips alternating with four 2-1/2'' sashing squares to make a sashing row. Make a total of five sashing rows.

3. Lay out the block rows alternating with the sashing rows and sew together to complete the quilt top.
I'm showing you my finished quilt here rather than my sample so you can see the layout for 12 blocks.


Finishing the Quilt
Layer the quilt top, batting and backing and quilt as desired. Use the four 2-1/2'' x 42'' binding strips to bind the quilt.

Pictures of my finished wall hanging to come later...I need to get some backing fabric to finish it! 

In the meantime, I've joined the talented quilters at 15 Minutes Play in a 12-week Color Challenge. I'll be sharing my blocks here as well each week, as well as some other things I'm working on, and adding photos of my finished quilts to this blog's gallery page.

Thursday, April 19, 2012

This Nursery's a Zoo! Quilt Tutorial

Remember my post about the nursery and this quilt?


Today I'm starting a tutorial on how to make this baby quilt, which I've called "This Nursery's a Zoo!" Here's an image of the whole quilt. It measures approximately 31" x 40-1/2", featuring four rows of three blocks each. You could make yours smaller or larger by adding or subtracting blocks and sashings, but the tutorial below focuses specifically on this size.


Since it's more fun to quilt along with you, I chose some brights from my stash and I'm making a wall hanging version of this quilt to help me illustrate how to make these blocks. Plus, it's fun to see the pattern in something a little different. I think you'll like how cheery it is in bold colors; I know I do!

Let's start out with what you'll need, fabric-wise. 


Materials:
  • 1/2 yard of a light dot (for appliqué block backgrounds)
  • 6 coordinating fat quarters or 1/4 yard cuts (for pieced blocks and appliqués)
  • 1/2 yard of a coordinating print (for sashing) Note: This is a fun place to use a stripe like I did!
  • 1/4 yard of a coordinating print (for sashing squares)
  • 1/3 yard of a coordinating print (for binding)
  • 1-1/3 yards of backing fabric
  • 37'' x 48'' piece of batting
  • Fusible web

I chose these bright prints below--the bright dots on a cream background for the backgrounds of the appliqué blocks, and the bright prints, already sorted into pairs, for the pieced blocks. I'll choose my sashing, sashing squares and binding after I've made the blocks.

And now it's time to get out that rotary cutter and ruler!


Cutting:
From the light dot:
Six 8'' squares

From each of the fat quarters (or ¼ yard cuts):
Three 3'' squares
Two 3'' x 8'' pieces

From the sashing fabric:
Seventeen 2-1/2'' x 8'' pieces

From the sashing squares fabric:
Twenty 2-1/2'' squares

From the binding fabric:
Four 2-1/4'' x 42'' strips

Ready to make the easy blocks, the pieced ones? (Did I mention that I am not a fan of appliqué? Why did I choose to make a baby quilt with appliquéd animals for my baby, you ask? Good question. I'm still not sure.)

Making the Pieced Blocks
1. Sort the 3'' squares and 3'' x 8'' pieces into six block piles. Each pile should include two 3'' squares and two 3'' x 8'' pieces cut from the same fabric and one 3'' square cut from a contrasting fabric.


2. From the first pile, sew the match 3'' squares to opposite sides of the contrasting square and press. Sew the 3'' x 8'' pieces to the top and bottom to complete the block.


The finished block:

3. Using the remaining piles, make a total of six blocks. I'm just showing you three here to whet your appetite. Can you tell I love dot and circle prints?!

That was easy, right? Next up, the appliquéd blocks and quilt assembly.