Showing posts with label nursery. Show all posts

Monday, April 23, 2012

This Nursery's a Zoo! Quilt Tutorial, part 2

This is the second post in my nursery quilt tutorial. For the first post, click here.

It's time to make the appliqué blocks!
You'll see several tips scattered throughout this section. Let's just say that most of them were born of mistakes I made during my first few appliqué projects!


Making the Appliqué Blocks
1. Print out the templates (click for the liongiraffe and elephant patterns) and trace onto the paper side of fusible web. Cut out around each animal shape, leaving approximately 1/2'' past the drawn line. 

Pair up your fabrics for each animal block. Once you've decided what fabric to use for which animal parts, follow the manufacturer's directions and press fusible web to the back of the appropriate fabrics. 


Tip: Position your animal shapes carefully to keep (or avoid) certain elements in the fabric. Cut out each shape on the drawn line.

2. Fold and lightly press each 8'' background square in half in both directions to find the center point. Use this point as a guide for centering the animals on the background square.


3. Remove the paper backing from the fusible web. Tip: I sometimes have trouble with this, so whenever possible, I choose an initial separation point that will be covered by another appliqué element.
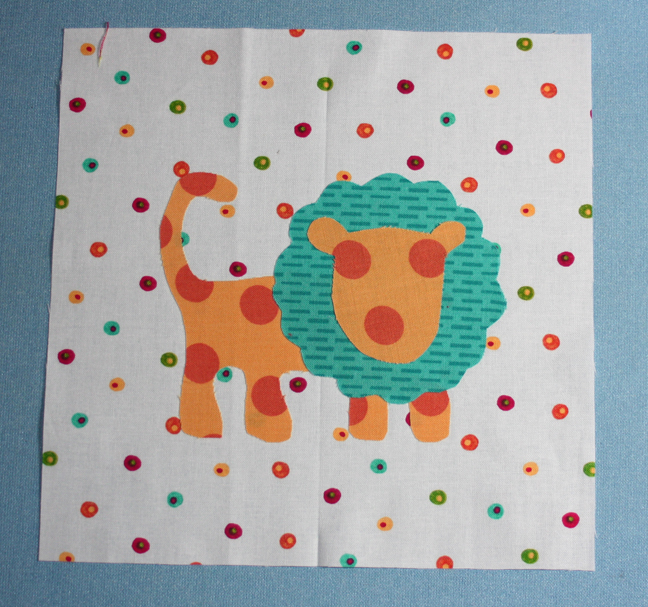
4. Press the shapes to the background square. I prefer to press one shape at a time, beginning with the base layer (so, first the lion body, then the mane, and then the face).


5. If desired, press lightweight interfacing to the back of the square to serve as a stabilizer, making sure it goes beyond the area the appliqué covers. Tip: Even though I use fusible interfacing, I still pin the corners because I've had the interfacing ''unstick'' before, which just makes a mess when it doubles up as you're stitching.
6. Choose a coordinating or contrasting thread color (or colors!) for zig zag stitching the appliqués in place. I chose turquoise because I knew it would tie in nicely with my sashing fabric. 

Choose a stitch length and width. Tip: Audition the stitch size on scraps first. I like to choose a happy medium because it's more forgiving of my stitching errors. Stitch the animal pieces on each block and press.

If you used a stabilizer, trim the interfacing around the stitching.


Assembling the Quilt
Note: My sample only has two blocks rows and three sashing rows because I'm making a smaller wall hanging. You will have four block rows and five sashing rows.
1. Lay out the blocks in four rows of three blocks each, alternating the pieced and appliqué blocks in each row. Add four 2-1/2'' x 8'' sashing strips to each row, alternating with the blocks. Sew the sashing strips and blocks together in each row to make a block row.


2. Lay out three 2-1/2'' x 8'' sashing strips alternating with four 2-1/2'' sashing squares to make a sashing row. Make a total of five sashing rows.

3. Lay out the block rows alternating with the sashing rows and sew together to complete the quilt top.
I'm showing you my finished quilt here rather than my sample so you can see the layout for 12 blocks.


Finishing the Quilt
Layer the quilt top, batting and backing and quilt as desired. Use the four 2-1/2'' x 42'' binding strips to bind the quilt.

Pictures of my finished wall hanging to come later...I need to get some backing fabric to finish it! 

In the meantime, I've joined the talented quilters at 15 Minutes Play in a 12-week Color Challenge. I'll be sharing my blocks here as well each week, as well as some other things I'm working on, and adding photos of my finished quilts to this blog's gallery page.

Thursday, April 19, 2012

This Nursery's a Zoo! Quilt Tutorial

Remember my post about the nursery and this quilt?


Today I'm starting a tutorial on how to make this baby quilt, which I've called "This Nursery's a Zoo!" Here's an image of the whole quilt. It measures approximately 31" x 40-1/2", featuring four rows of three blocks each. You could make yours smaller or larger by adding or subtracting blocks and sashings, but the tutorial below focuses specifically on this size.


Since it's more fun to quilt along with you, I chose some brights from my stash and I'm making a wall hanging version of this quilt to help me illustrate how to make these blocks. Plus, it's fun to see the pattern in something a little different. I think you'll like how cheery it is in bold colors; I know I do!

Let's start out with what you'll need, fabric-wise. 


Materials:
  • 1/2 yard of a light dot (for appliqué block backgrounds)
  • 6 coordinating fat quarters or 1/4 yard cuts (for pieced blocks and appliqués)
  • 1/2 yard of a coordinating print (for sashing) Note: This is a fun place to use a stripe like I did!
  • 1/4 yard of a coordinating print (for sashing squares)
  • 1/3 yard of a coordinating print (for binding)
  • 1-1/3 yards of backing fabric
  • 37'' x 48'' piece of batting
  • Fusible web

I chose these bright prints below--the bright dots on a cream background for the backgrounds of the appliqué blocks, and the bright prints, already sorted into pairs, for the pieced blocks. I'll choose my sashing, sashing squares and binding after I've made the blocks.

And now it's time to get out that rotary cutter and ruler!


Cutting:
From the light dot:
Six 8'' squares

From each of the fat quarters (or ¼ yard cuts):
Three 3'' squares
Two 3'' x 8'' pieces

From the sashing fabric:
Seventeen 2-1/2'' x 8'' pieces

From the sashing squares fabric:
Twenty 2-1/2'' squares

From the binding fabric:
Four 2-1/4'' x 42'' strips

Ready to make the easy blocks, the pieced ones? (Did I mention that I am not a fan of appliqué? Why did I choose to make a baby quilt with appliquéd animals for my baby, you ask? Good question. I'm still not sure.)

Making the Pieced Blocks
1. Sort the 3'' squares and 3'' x 8'' pieces into six block piles. Each pile should include two 3'' squares and two 3'' x 8'' pieces cut from the same fabric and one 3'' square cut from a contrasting fabric.


2. From the first pile, sew the match 3'' squares to opposite sides of the contrasting square and press. Sew the 3'' x 8'' pieces to the top and bottom to complete the block.


The finished block:

3. Using the remaining piles, make a total of six blocks. I'm just showing you three here to whet your appetite. Can you tell I love dot and circle prints?!

That was easy, right? Next up, the appliquéd blocks and quilt assembly. 


Wednesday, April 11, 2012

Nursery Take Two

The beauty of a new house is a blank slate for decorating. When it came to the boys' room, I wanted to use the same nursery decor that I'd used for my first son, but I knew that I'd need something more grown up in a year or two. And I really didn't want to repaint down the road!

So I tried to plan long-term as well as short-term. The original nursery was painted a much lighter teal. I wanted something bolder, more little boy-like, so I chose the darker teal. (See my paint sample journey here.) It still matched with my baby quilt, bumpers, and wall art, but I had a color palette in mind for the room's next look. We'll get to that. But first, the fabric parts of the boys' room:

I designed this quilt before my first baby was born. I loved the teal and mocha combination as a gender-neutral nursery. I wanted an animal theme, but I didn't want cutesy fabric. I created these animal appliques and chose Back Porch Bouquet from Bate & Taylor for Maywood Studio. I'll be sharing the pattern for this quilt here on the blog shortly...check back!

Besides the fact that I really liked all of my nursery stuff, check out these pieced stuffed animals--way too much time invested in this nursery to choose a different route the second time around! I love these animals--from Rumpled Quilt Skins patterns.

Wall art I'd made, to coordinate with the quilt and stuffed animals. So technically it's not yet up on the wall here, but I didn't want to wait for it to be hung to write this post! I bought blank canvases and acrylic paints at Michaels, cut the animal shapes out of fabric, and created wall art.

Hard to see the fabric here, but we replaced the accordion closet doors with fabric panels. The boys love to play in these curtains, and the light pin dot print (from the same collection) nicely breaks up the deep teal walls.

I love being able to use all of these elements again, but with a fresh feel because of the new paint color. And, I'm even more excited about my plans for a "big boy" bedroom after we're done with the crib and nursery look. I found this, from one of the Sherman Williams inspiration booklets.
What a great color scheme! I'm in love with it.
The boys' closet, though you can't see from the pictures (and believe me, with the mess in the closet right now, there's no way I'm taking a photo to share!), is actually a huge walk-in closet. We've transformed it into a bit of a toy room like what you see in the photo--little boys don't have a lot of hanging clothes. I'm going to paint it that butter yellow color, and then make matching quilts using the four colors shown here. I can't wait! I've already got some designs in mind... Think we should try the barn door too?


Wednesday, April 4, 2012

How many swatches does it take to paint a room?

By my count, at least 20!

I had a vision for what I wanted my boys' room to look like, and it involved a fairly dark wall color. I'm not afraid of wall color--the further away from white or cream it is, the happier I am! But choosing the right shade was tricky. If I was off just a little bit, the room would look like an 80s remake. And while those 80s styles are coming back in clothing, they're definitely not returning to popularity in home decor!
I was aiming for a dark teal. Every time I went to a home improvement store (often), I picked up more swatches. What looked perfect in the store was murky deep-sea green or super blue at home. Twice I thought I had the right swatch picked out and brought home a sample jar to try on the wall.

I wasn't kidding when I said I was all over the place on the right color--look how different these two are!
And, a quick side story. Getting the boys' room completely put together was absolutely first on my list (well, actually tied with removing the kitchen wallpaper).  The day the movers brought our things to the house, my best friend, who is an interior designer, was visiting to help corral the boys. She and I disappeared upstairs while my husband was immersed in kitchen boxes, trying to get our house in some semblance of working order. Meanwhile, she and I are merrily auditioning the first sample color on the wall, holding up fabrics for matching and looking from different angles to see how the light changed the color. I had an expert in the house--I wanted to take advantage of getting her opinion! Makes sense right?
About 20 minutes and several boxes later, he comes looking for us. Seven years of marriage means that he *knew* I hadn't disappeared to unpack boxes. His incredulous response: "You're painting? We have a houseful of boxes to put away and you're trying out paint colors?!" Yup. Clearly we had/have different priorities! :) And I'm so grateful that he's an incredibly efficient box unpacker. He had that kitchen whipped into shape before we went to bed!

The swatch that is X'ed out is the paint color I bought. Menard's mixed a primer for me that was the color of the swatch with the arrow. I put that up, thought it looked pretty good, and wondered how much darker the X'ed swatch would be. The answer: TOO dark. I went back the next day for a gallon of the arrow'ed color. And if anyone wants a gallon of a very dark (but beautiful) teal, let me know. I've got one to spare. Click here to see pictures of the finished room, the quilt(s), bumpers, closet curtain and wall art that go with it, and my future plans to convert it from nursery into toddler style.