Showing posts with label pillow. Show all posts

Friday, December 15, 2023

Holiday Hack #1

 As my helpful 9-year-old keeps pointing out, Christmas is in 10 days. 😬


And I'm starting to realize that I need to remove some things from my to-do list (but that's another post...!). But finishing up holiday gifts is staying on the list - and here's how!

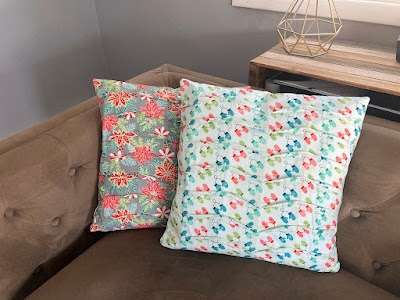
So...you joined the Strippy Improv Holiday QAL with grand plans. And you've got one block pieced. The other three aren't going to happen in the next 10 days. So what can you do instead? Make a throw pillow! 


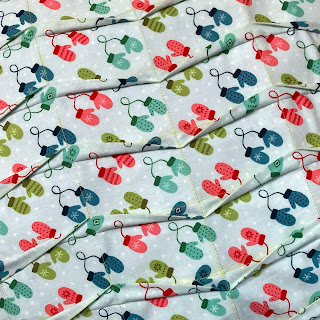
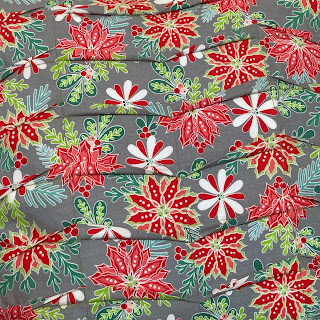
For me, it started with this fun coffee cup/hot cocoa mug fabric from Benartex's Country Christmas collection. Such cute fabric! Perfect for a pillow!

Here's a quick pillow tutorial:

Make your block - I chose to fussy cut one of those cute hot chocolate cups to use in my Strippy Improv Snowglobe block. 

I framed the block, just like in the pattern. Then I added 4-1/2" wide strips to the right and left sides, and then to the top and bottom. This creates a pillow front that is roughly 17" square. Cut a 17" backing square as well.

This HeatnBond Fusible Fleece 1 yard pack is perfect for creating a 16" square pillow because you can cut and fuse (2) 17" squares to the wrong side of your pillow front and back! I did straight line machine quilting to secure the fused batting in place, and then finished the pillow with a zipper.


That's it! If you have the block made already, you're halfway done! I assembled this pillow in 1 hour last night. Instant gift! (And then you can make the 4-block Strippy Improv Holiday quilt next year!)


Need the pattern? Get it here


Missed the QAL? Start here to catch all the tips I shared. 

And watch the YouTube videos here.


Thursday, January 27, 2022

Pillow Talk: Pleated Pillow Tutorial


We can all use more throw pillows in our houses, right?! 
I'm starting a new tutorial series called Pillow Talk. Roughly once per month, I'll be sharing a video tutorial showing how to make a specific style of pillow. 


This month, I'm sharing how to stitch a pleated pillow. I just LOVE the texture that these pillows have, and it's so easy to create. 


Benartex has provided the fabric for these tutorials. For this project, I chose four prints from Cherry Guidry's Heart & Home collection from Benartex Fabrics*. They're wintry but fresh and bright, and I really like them. 

You can find the video tutorial here, on my YouTube channel (don't forget to subscribe!), but I've also included some of the numbers required for this project below for reference. 

You'll need (per pillow) 
  • 5/8 yard of two fabrics*
  • 1-yard package Thermoweb Fusible Interfacing*
  • 18" square pillow insert
  • 14" long zipper in a coordinating color
  • Fabric marking pen/pencil/etc.
*These supplies were provided by the companies indicated to create this tutorial. 


Cutting
From the pillow front fabric:
(1) 18-1/2" x 27" piece

From the pillow back fabric:
(1) 18" square (unless you want to make both sides pleated...then you'll need a second 18-1/2" x 27" piece)

From the fusible interfacing:
(1) 18" x 19" piece
(1) 18" square (unless you want to make both sides pleated...then you'll need a second 18" x 19" piece)


Fabric Marking Info
(Note: These instructions won't make sense on their own--you'll need to view the video for steps)
  • Measure 2-1/2" in from one short end of the front fabric piece and draw a stitching line.
  • Draw a second line (the folding line) 1/2" from the first line. 
  • Fold press and stitch pleat as directed in the video.
  • Measure 2" from the stitched line and mark your next stitching line. Measure 1/2" in from that and draw your next folding line.


I hope you enjoy trying this pillow making technique! 


If you're new here, welcome! I hope you'll stay and look around a bit. 
If you like what you've seen here, you can also find me:
To find all of my quilt patterns, visit my Etsy shop
Find me on IG here.
Find me on Facebook here.
Sign up for my newsletter in the right-hand sidebar or here
(You'll receive a free pattern for my Diamond Drama quilt (below) as a thank you!)


Sunday, November 1, 2015

ALYOF: The purple "N" pillow

I tried to make this month's ALYOF goal a lot harder than it needed to be. My plan was to make a pillow for a good friend with Northwestern's "N" on it (we both went to school there). I intended to piece the pillow front, figuring that with a few well-placed HSTs, I'd be set.


Not so much.
Even though I looked at that logo for 4 years of college and umpteen times (especially every Saturday in fall, when I put my shirt on for the football game!) in the 15 years since, apparently I'd never examined it with a quilter's eye.
Not so easy to piece.
So I took the easy route--applique!
And finished the pillow (which has been on my mental to-do list since August) in about two hours, mainly because of all of the straight line quilting.
(badly lit phone photo because my good camera and
my computer were not on speaking terms tonight!)

Hoping I can find a few other fellow Northwestern alums who would like one, as this pillow was fun to make!
Linking up with ALYOF at Sew BitterSweet Designs.