Showing posts with label On the Go. Show all posts

Tuesday, May 9, 2023

Summer Twilight Blog Hop


When Tammy Silvers asked me to play with the batiks in her new Summer Twilight collection from Island Batik, I was happy to! Teals, blues, greens and fuchsia - such a great color palette! I especially love the sparkly star shapes and the dotted mounds. 


I recolored four of my quilt patterns in Tammy's fabrics. Take a look: 

Sew a Garden - Nine rows of piecing fun! 


Pennant Party - Appliqued pennants with the option of creating 3D pennants that flap!


On the Go - One-seam blocks! Available in baby and lap quilt sizes


Rhombi - A variation on a log cabin block

I'm not the only one playing with the Summer Twilight fabrics - check out what these other talented designers have done as well! 
May 11 Laura Piland


Wednesday, September 29, 2021

Peacock Plumes Virtual Blog Hop

Hello! It's my day on the Peacock Plumes Virtual Blog Hop, and I'm excited to share how Tammy's fabric collection looks in a few of my quilt patterns. 


These Island Batik fabrics have such a fun fall vibe--perfect for the season.


I used the full collection in my On the Go quilt--pairing the batiks with white helps the colors to really pop! 

Purchase the On the Go pattern here.

I'm a teal girl at heart, so I knew I wanted to use a limited color palette of mostly teals in one design. Here's Ribbon Weave, a wall hanging/table topper, in all its teal glory. 

Purchase the Ribbon Weave pattern here.

Swirls, anyone? The That's a Swirl applique quilt is packed with design appeal, and pairing the batiks with solid black enhances the contrast. This quilt is all about the cutting--the only piecing is sewing the blocks together. Fusible web does the rest. 

Purchase the That's a Swirl quilt pattern here.


When I first saw Tammy's Peacock Plumes fabric, I knew immediately that I wanted to audition them in my Frequency quilt pattern. I had so much fun, I couldn't decide which to share, so I'm showing them all to you!

Lighter background:

Purchase the Frequency pattern here.


Darker background:


Half Frequency on plum:


                                                      Half Frequency on deep teal:

Thanks, Tammy, for asking your designer friends to play with these fun fabrics! 
See everyone's designs:

Sept 27:        Tammy Silvers - Tamarinis

                      Jen Frost - Faith and Fabric

                      Geeky Bobbin  

Sept 28:         Leanne Parsons - Devoted Quilter

                      Laura Strickland - Orange Blossom Quilt Design

                      Sara Flynn - Offbeat Quilts

                      Pamela Boatright - Pamela Quilts

Sept 29:         Swan Sheridan - Swan Amity Studios

                      Lisa Ruble - Love to Color My World - That's me!

                      Claudia Porter - Create with Claudia

Sept 30:        Laura Piland - Slice of Pi Quilts

                      Raija Salomaa - Quilter's Treasure Chest

                      Kathryn LeBlanc - Dragonfly's Quilting Design Studio

Oct 1:            Kate Colleran - Kate Colleran Designs

                     Sherry Shish - Powered By Quilting

                     Becca Fenstermaker - Pretty Piney Quilts


If you're new here, welcome! I hope you'll stay and look around a bit. 
If you like what you've seen here, you can also find me:
To find all of my quilt patterns, visit my Etsy shop
Find me on IG here.
Find me on Facebook here.
Sign up for my newsletter in the right-hand sidebar or here
(You'll receive a free pattern for my Diamond Drama quilt (below) as a thank you!)

Tuesday, July 23, 2019

NEW Pattern Release: On the Go

I'm excited to release my latest pattern, On the Go!
Purchase the pattern here.


The idea for this quilt has been in my floating around since last fall, when I first started playing with the design in Adobe Illustrator. The quilt has a lot of movement, but it's all from one simple block, made with only one seam. How's that for easy? 

The pattern features instructions to make the quilt in two sizes; a 48" x 56" baby quilt and a 64" x 80" lap quilt. 

This is the baby quilt size; it debuted in Art Gallery Fabrics' lookbook for Mister Domestic's new collection, Catch & Release. As soon as I saw all those fun blue and teal prints, I knew the line would work perfectly for this quilt. 


I also sewed the lap size, using the Strata collection from Michael Miller. I love the texture of these blue, gray and beige prints! I think this version is destined to become my new couch snuggle quilt, but I might have to wrestle it from my boys, who all want it for their bed. We'll see who wins once it's quilted...

Lake photo on a windy day:

And an outtake. Sometimes it's hard to explain to your quilt corner holders that you don't actually want them to be visible in the photo! 


On the Go is available as a digital download in my Etsy shop

Here's a peek at the yardage requirements as well. I included specific instructions for directional prints, as it changes the cutting slightly. 

In case you missed it, find the tutorial for the Gone Fishin' Pouches, also made from Mister Domestic's Catch and Release fabrics, here.


Friday, July 19, 2019

Gone Fishin' Pouch Tute

What happens when you finish a quilt and the leftover fabrics keep calling your name? 
You make fish-shaped zip pouches, of course! 

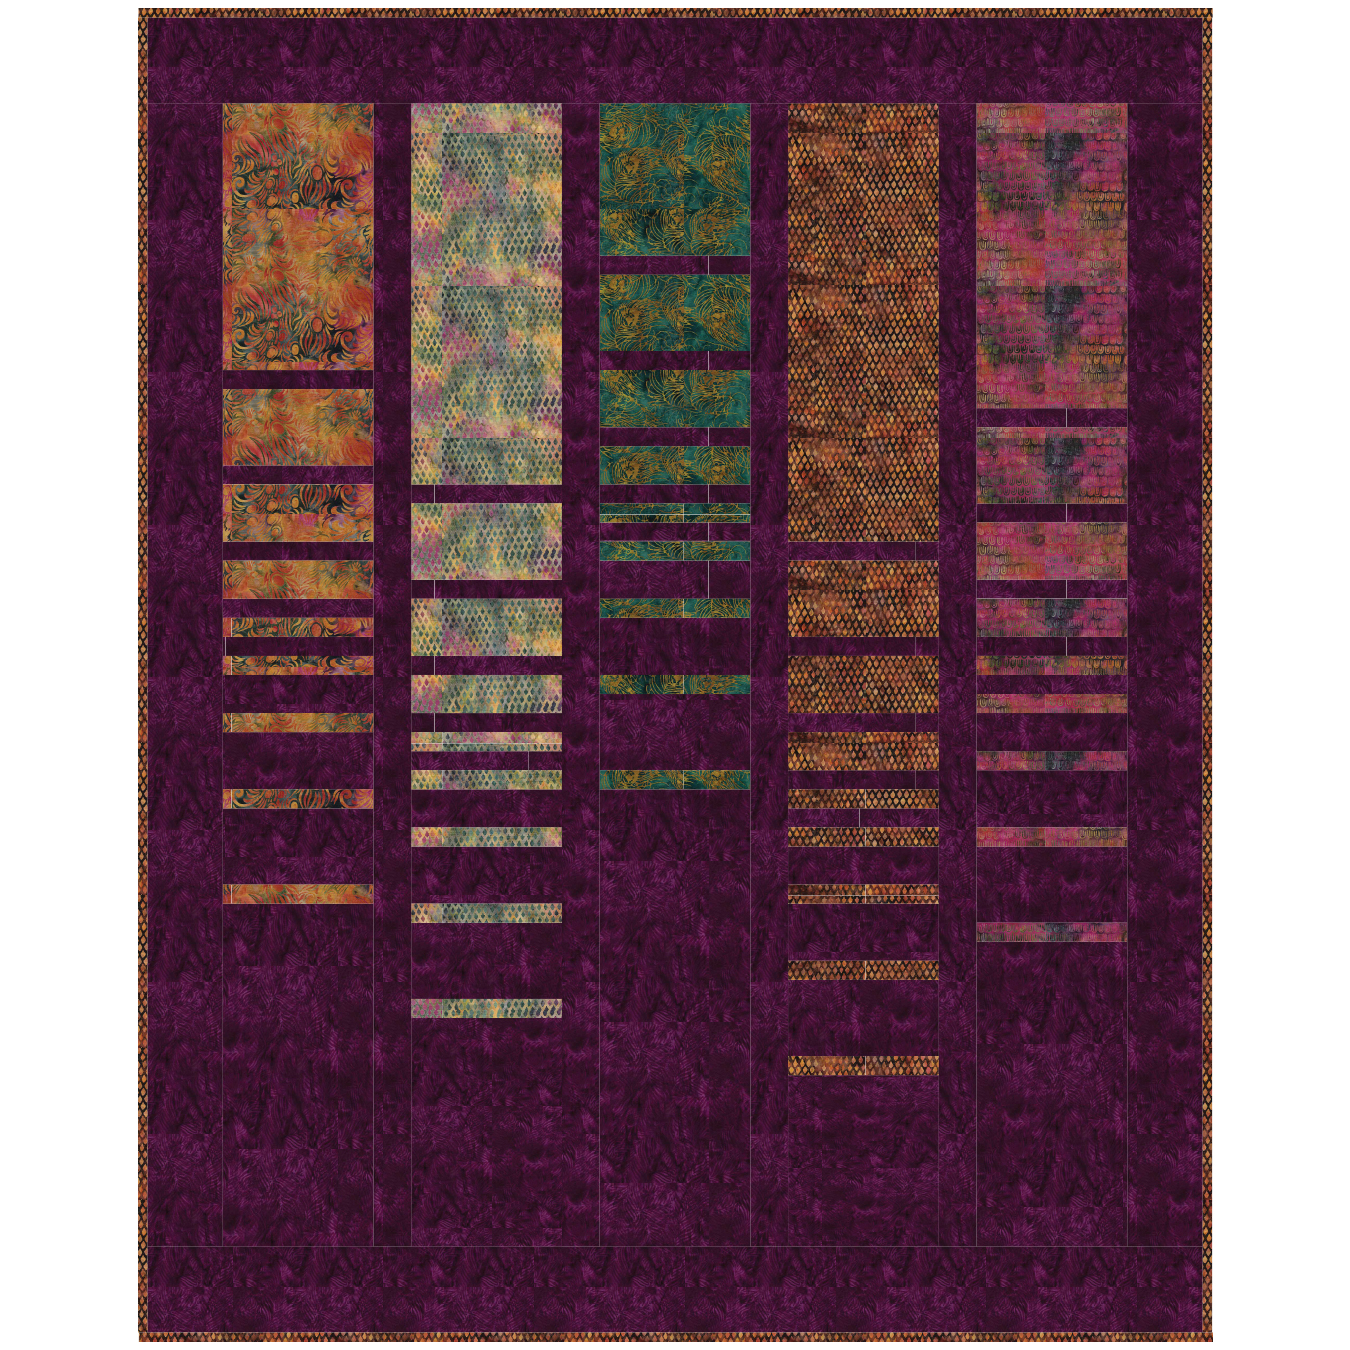
When I saw Mister Domestic's new Catch & Release collection for Art Gallery Fabrics, I new it was the perfect fit for my new On the Go quilt pattern. I sewed a baby quilt-sized version (48" x 56") which you can find in the Catch & Release lookbook. You can purchase the pattern here

Back to the pouches. 
I have three boys. The only thing they currently love more than zip pouches is making friendship bracelets from embroidery floss. I wanted to play off the fish theme of these fun fabrics and create a fish-shaped zip pouch for each of them to hold their embroidery floss creations.
These are quick and easy and so much fun!
Use the tutorial below to make your own (or three).


You'll Need:
  • 2 fat quarters (or a couple more, if you want to make the striped version--find instructions for it near the bottom of this post)
  • (1) 9" long coordinating zipper
  • Fusible fleece
Download the fish template here.

Cutting:
Note: Cut carefully if your fabric is directional!

From navy fish fat quarter:
(1) 9" x 12-1/2" piece
(2) 4-1/2" x 12-1/2" pieces
(2) 2" x 4" pieces

From paddle fat quarter:
(1) 9" x 12-1/2" piece
(2) 4-1/2" x 12-1/2" pieces

From fusible fleece:
(1) 9" x 12-1/2" piece
(2) 4-1/2" x 12-1/2" pieces

Make the Pouch:
Step 1 Fuse (1) 4-1/2" x 12-1/2" fusible fleece piece to the wrong side of each 4-1/2" x 12-1/2" navy fish piece. Fuse the 9" x 12-1/2" fusible fleece piece to the wrong side of the 9" x 12-1/2" navy fish piece.


Step 2 Fold and press 1/4" in on each short end of (1) 2" x 4" navy fish piece, wrong sides together. Fold the piece in half wrong sides together as shown. Make (2).


Step 3 Prep your zipper. You'll be adding the tabs from Step 2 to both ends of the zipper. I think it's helpful to stitch across the top end of the zipper to help keep the sides together as shown in the photo. Then measure 8-1/2" from the top edge of the zipper and stitch across the zipper to secure. Trim zipper from top edge to measure 9". 


Step 4 Position the bottom end of the zipper inside a folded tab from Step 2 as shown. Fold the tab over and stitch across to secure the zipper in the tab.


Step 5 Repeat on the top end of the zipper. Your zipper should now look like this: 


Step 6 Trim the tabs even with the zipper tape as shown.


Step 7 Lay the 4-1/2" x 12-1/2" navy fish piece right side up. Position the zipper right side down on the navy fish piece. Lay the 4-1/2" x 12-1/2" paddle piece right side down on top, aligning wrong edges. Stitch along the edge using a zipper foot.


Step 8 Fold the navy fish piece and paddle lining piece away from the zipper, wrong sides together and press. Topstitch along the edge of the zipper.


Step 9 In the same way, add the remaining 4-1/2" x 12-1/2" navy fish and paddle pieces to the opposite sides of the zipper, sandwiching as shown.


Step 10 Machine quilt the pouch top as desired. I did straight line stitching using my walking foot, approximately 1/2" apart.


Step 11 Baste the 9" x 12-1/2" paddle piece to the fleece side of the 9" x 12-1/2" navy fish piece and machine quilt as desired. 

Step 12 Cut out the fish template. Position it on the pouch top, centering the fish on the zippper. Make sure the zipper is at least 1" from the point of the fish head. Trace the fish shape onto the pouch top and cut out. 

Step 13 Position the fish pouch top right sides together on the pouch back and pin in place. Make sure the zipper is unzipped! Stitch around the fish shape 1/4" from the edges. 

Step 14 Trim the pouch back to the fish shape. Cut notches in the seam allowance of tight corners (such as where the body meets the tail), making sure not to cut through the stitching line. Trim the ends of the tail tips. If desired, serge or zigzag stitch around the outer edge to prevent fraying. 

Step 15 Turn the pouch right side out. You'll have to gently poke the tail tips to make them look right.


Want to make the striped version? It's easy! 

Prep: Cut (6) 1-3/4" x 12-1/2" strips. Sew them together in groups of (3) to make (2) 4-1/4" x 12-1/2" pieced strips. Follow steps 1-15 to make the fish pouch. 


No hooks needed for these fish! 


The pouches coordinate with my On the Go quilt. This design features just ONE block that has just ONE seam. How's that for simple?! The pattern also includes directions for making a lap-size version. Purchase the pattern here.

And a little behind the scenes shot. How many people does it take to hold the quilt for a photo? Four. It takes four.

See the entire Catch & Release collection here
Find more from Mister Domestic here and on Instagram.
Follow me on Instagram here.

Sunday, June 30, 2019

OMG: On the Go Quilt

My June One Monthly Goal at Elm Street Quilts was to assemble the blocks in my On the Go quilt. I finished! Taking a good photo was harder than assembling the quilt...

This pattern sews up quickly because each block has only one seam. Yep, just one! 

I actually just finished a baby-sized version, which I'll show later this summer. Now to write the pattern...

And of course, the outtake, with one of my photography assistants. :)