Wednesday, September 29, 2021

Peacock Plumes Virtual Blog Hop

Hello! It's my day on the Peacock Plumes Virtual Blog Hop, and I'm excited to share how Tammy's fabric collection looks in a few of my quilt patterns. 


These Island Batik fabrics have such a fun fall vibe--perfect for the season.


I used the full collection in my On the Go quilt--pairing the batiks with white helps the colors to really pop! 

Purchase the On the Go pattern here.

I'm a teal girl at heart, so I knew I wanted to use a limited color palette of mostly teals in one design. Here's Ribbon Weave, a wall hanging/table topper, in all its teal glory. 

Purchase the Ribbon Weave pattern here.

Swirls, anyone? The That's a Swirl applique quilt is packed with design appeal, and pairing the batiks with solid black enhances the contrast. This quilt is all about the cutting--the only piecing is sewing the blocks together. Fusible web does the rest. 

Purchase the That's a Swirl quilt pattern here.


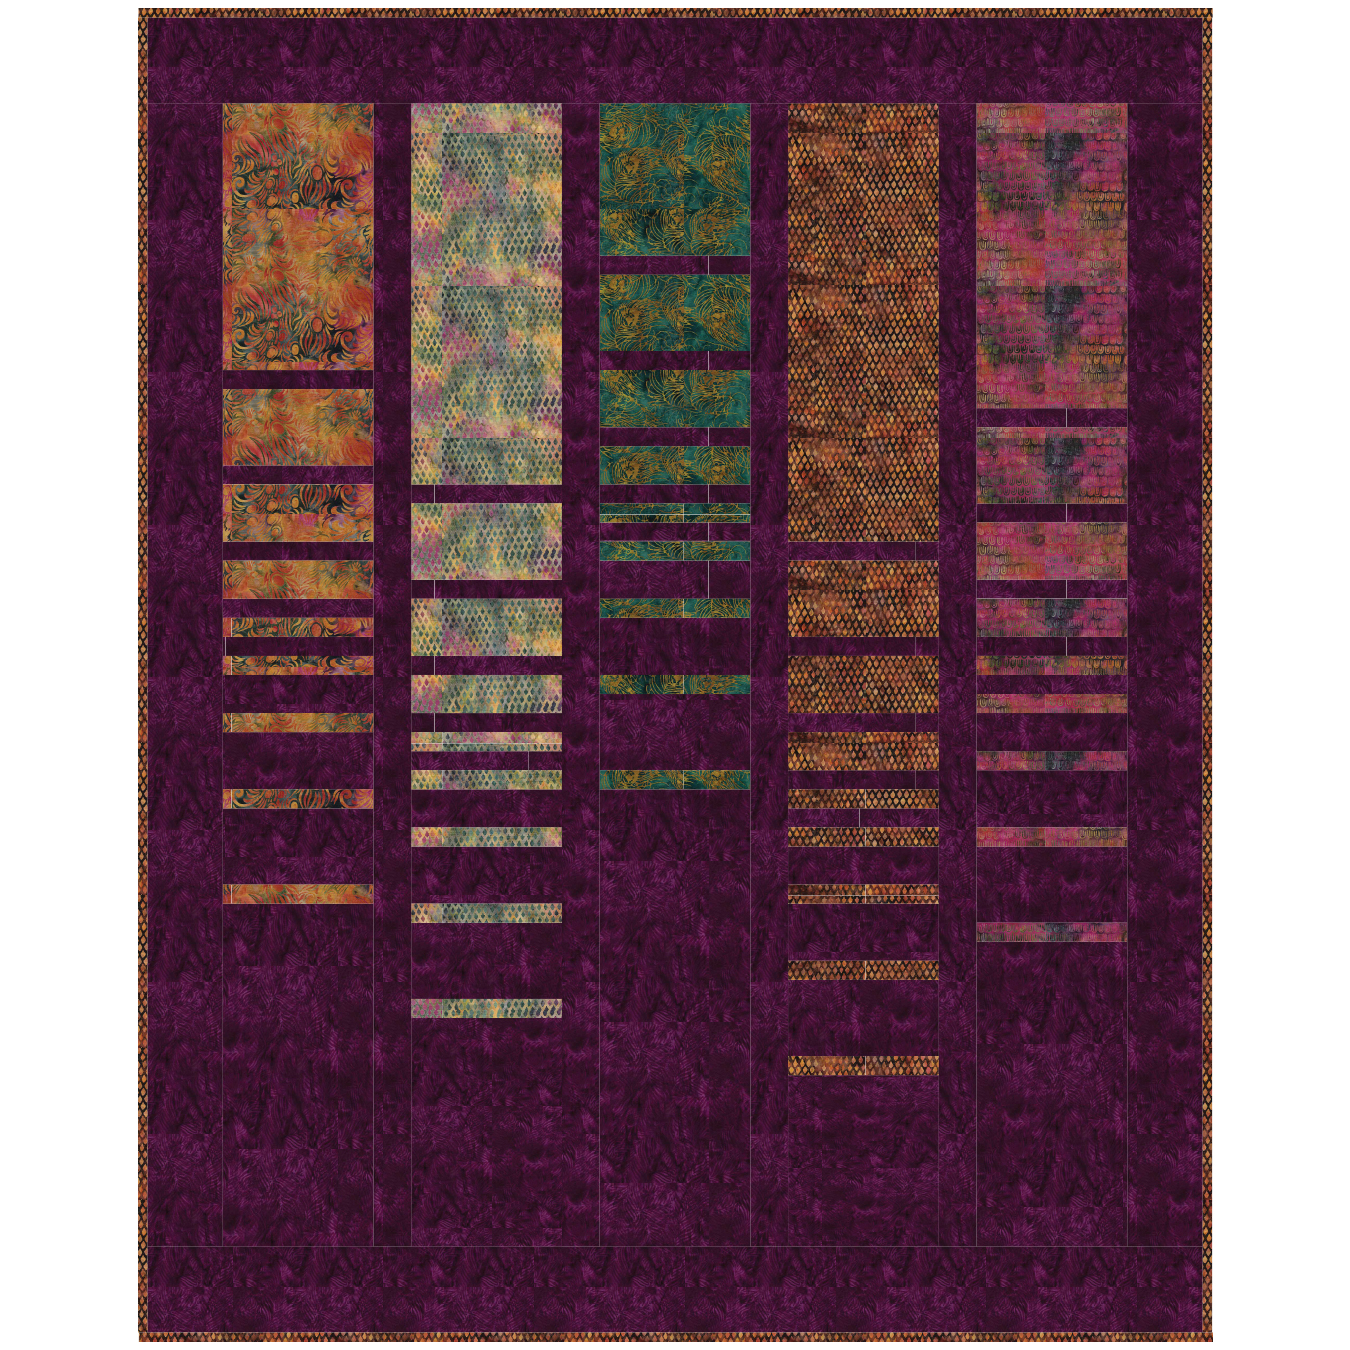
When I first saw Tammy's Peacock Plumes fabric, I knew immediately that I wanted to audition them in my Frequency quilt pattern. I had so much fun, I couldn't decide which to share, so I'm showing them all to you!

Lighter background:

Purchase the Frequency pattern here.


Darker background:


Half Frequency on plum:


                                                      Half Frequency on deep teal:

Thanks, Tammy, for asking your designer friends to play with these fun fabrics! 
See everyone's designs:

Sept 27:        Tammy Silvers - Tamarinis

                      Jen Frost - Faith and Fabric

                      Geeky Bobbin  

Sept 28:         Leanne Parsons - Devoted Quilter

                      Laura Strickland - Orange Blossom Quilt Design

                      Sara Flynn - Offbeat Quilts

                      Pamela Boatright - Pamela Quilts

Sept 29:         Swan Sheridan - Swan Amity Studios

                      Lisa Ruble - Love to Color My World - That's me!

                      Claudia Porter - Create with Claudia

Sept 30:        Laura Piland - Slice of Pi Quilts

                      Raija Salomaa - Quilter's Treasure Chest

                      Kathryn LeBlanc - Dragonfly's Quilting Design Studio

Oct 1:            Kate Colleran - Kate Colleran Designs

                     Sherry Shish - Powered By Quilting

                     Becca Fenstermaker - Pretty Piney Quilts


If you're new here, welcome! I hope you'll stay and look around a bit. 
If you like what you've seen here, you can also find me:
To find all of my quilt patterns, visit my Etsy shop. 
Find me on IG here.
Find me on Facebook here.
Sign up for my newsletter in the right-hand sidebar or here. 
(You'll receive a free pattern for my Diamond Drama quilt (below) as a thank you!)
Wednesday, September 15, 2021

Strippy Improv Halloween Sneak Peek

Who's ready for Halloween? We haven't started talking costumes at my house yet (I'm still recovering from the back to school busy-ness!), but I know it's right around the corner. As are hidden bags of Halloween candy for me to snack on! :) 

When I created the Strippy Improv Holiday pattern last year, I knew I could have a lot of fun using the technique for other holidays--especially Halloween! 

I've been working on a spooky version and here's a sneak peek at the blocks. Aren't they fun?!

 I learned a lot about bat shapes as I worked on a template block--bats come in so many different varieties! I wanted one that didn't look like Batman (ha!) but also would fill a square block nicely. 


I love choosing white tonals and light grays for a haunting ghost block. Does he remind you of Casper? 


The back arch for the black cat is key!


The pumpkin is hands down my favorite. I think a wall hanging, table runner or pillow of just pumpkins would be fun too! 


The Strippy Improv Halloween pattern will include the templates for all four blocks (plus a few extra surprises!), as well as instructions for the strippy improv technique and both table runner and wall hanging finishing options. And wait until you see the fun fabric I have for borders!

If you want to receive a heads up when the pattern is released (week of Sept. 20th), sign up for my newsletter below and/or follow me on IG - scroll down for the links.


Thanks to Benartex for the fabric and Thermoweb for the HeatnBond Lite fusible webbing to make this project!


Here's a quick look at the Strippy Improv Holiday table runner:

The pattern is available in my Etsy shop.

If you're new here, welcome! I hope you'll stay and look around a bit. 
If you like what you've seen here, you can also find me:
To find all of my quilt patterns, visit my Etsy shop. 
Find me on IG here.
Find me on Facebook here.
Sign up for my newsletter in the right-hand sidebar or here. 
(You'll receive a free pattern for my Diamond Drama quilt (below) as a thank you!)

Tuesday, September 7, 2021

Log Cabin Goes Wonky

When I saw the theme for September's Quilt Block Mania was traditional with a twist, I knew exactly what I was going to do - wonky log cabins are some of my favorite blocks to make! I love log cabins of any kind, but when you add a little wonky to them, each block turns out slightly different - log cabins with attitude!  


Here's my block: a center square and three rounds of wonky logs. It's almost like a Choose Your Own Adventure book--each time you add a log, YOU get to choose the angle for it--which affects what your block will look like! 

The tutorial for making this block is on my subscribers only page - if you receive my newsletter, you'll find the link in the latest email. If you don't yet, you can subscribe to the newsletter in the right hand sidebar and you'll receive an introduction email with the link. I hope you enjoy making it!

If you like the way wonky log cabin blocks look, good news! I've got three quilt patterns that use this technique. You can find them all in my Etsy shop, and this week they are 10% off using code WONKY10.

The quilt that started it all: Wonky Spirals


Just add stripes: ZuZu Squares


Combine improv and traditional piecing: Wonk Around the Block


Make sure to check out all the other traditional with a twist blocks being shared this month!

Starry Steps Quilt Block by Carolina Moore
Log Cabin with a Twist by Appliques Quilts and More
Faux Log Cabin by PhoebeMoon Designs
Twisted Irish Chain by Inquiring Quilter
Pinwheel Pizzazz at Blue Bear Quilts
Rail Fence Roundabout at Perkins Dry Goods
Twirling Star by Mom and Me Quilting Co
Neon Churn Dash by Pretty Piney Quilts
Pinwheel Twist by QuiltFabrication
Quilt Block Exhibit
String of Stars by Orange Blossom Quilt Design Studio
log cabin twist by Duck Creek Mountain Quilting
Twisted Log Cabin at Penny Spool Quilts
Wonky Star by Patti's Patchwork
Modern Churn Dash at The Quilting Room with Mel
Shoo Two by Oh Kaye Quilting

Wednesday, September 1, 2021

September Monthly Color Challenge

It's time for the September block for the Monthly Color Challenge, hosted by Patterns by Jen.  


Here's my version of this month's block, based on the soft yellow of pineapple.

In our house, we call pineapple "dinner candy." 
Anything to get kids to eat a fruit or vegetable, right? It's food rebranding at its best. The name first came up when we'd grill pineapple rings sprinkled with cinnamon. And if you haven't tried that, you should--it's delicious, and truly does taste like candy! 

Another favorite recipe--at least for the adults in my house--is to make these pork tacos with pineapple from Cuisine at Home. Pineapple and pork are a delicious combo, and adding pineapple juice keeps the taco filling moist and flavorful. This is a great summer dinner! Find the recipe here.


And because I'm doing a little catch-up, here is my August block. Isn't that tan print perfect for representing mushrooms?!

Visit the rest of September's Monthly Color Challenge bloggers:
Jen Shaffer: https://patternsbyjen.blogspot.com/
Frances Arnold: https://francesquilts.com/
Lisa Ruble: lovetocolormyworld.blogspot.com
Raylee Bielenberg: http://www.sunflowerstitcheries.com/sunflower-quilting-blog/
 Andi Stanfield: https://truebluequilts.com/blog
Crystal Drummond: www.daybrookdesigns.com
 Ashli Montgomery: https://quilt2endalz.org

If you're new here, welcome! I hope you'll stay and look around a bit. 
If you like what you've seen here, you can also find me:
To find all of my quilt patterns, visit my Etsy shop. 
Find me on IG here.
Find me on Facebook here.
Sign up for my newsletter in the right-hand sidebar or here. 
(You'll receive a free pattern for my Diamond Drama quilt (below) as a thank you!)


Tuesday, August 31, 2021

Back to School! Pencil Case Tutorial

School has started! Hallelujah! All 3 of my boys went back to school yesterday, and today is the first full day. Happy dance for Momma!

 So of course, last week we did the official school supply shopping trip. So.many.pencils! Which reminded me of this fun tutorial I put together a couple years ago for PBS Fabrics using the Ring Ring collection. The fabric may be hard to be find by now, but the tute still works! My kids still have (and use, although not for school) these pencil cases. 


This pencil case measures 5-1/2" x 9"--perfect for holding newly sharpened #2s!


Ring Ring Pencil Case

You'll Need:
1 fat quarter each of (4) pencil prints and (1) blue dot print
(1) 12" zipper in a coordinating color
(1) 10-1/2" square of fusible batting


Cutting:
From each pencil print:
(1) 3-1/2" x 10-1/2" piece

From the blue dot:
(1) 10-1/2" square
(2) 1-1/2" x 3" pieces

Make the Pencil Case:
Step 1 Sew the (4) 3" x 10-1/2" pencil pieces together lengthwise.


Step 2 Fuse the 10-1/2" batting square to the back and quilt as desired. I stitched 1/4" on each side of the seams.


Step 3 Press in 1/4" on both short ends of the 1-1/2" x 3" blue dot pieces as shown. Fold and press the piece in half. 


Step 4 Tuck the zipper pull end of the zipper into the center fold of a blue dot piece. Stitch across the zipper to secure both sides of the blue dot piece to the zipper as shown. Align the zipper with the pieced bag square and trim the opposite zipper end 1/8" in from the end. Be careful not to pull the zipper apart! 


Step 5 Tuck the raw end of the zipper into the second folded blue dot piece and stitch to secure. Your zipper with tabs should be the same length as the pieced bag square.


Step 6 Trim the blue dot tabs even with the zipper width. 


Step 7 Lay the zipper right side down on the pieced bag square as shown and pin into place.


Step 8 Layer the 10-1/2" blue dot square right sides together on the zipper. Pin into place and stitch, using a zipper foot. 
Step 9 Press the pieced bag square and blue dot square away from the zipper. Topstitch 1/4" from the edge of the zipper. 


Step 10 Align the opposite end of the pieced square with the other side of the zipper, right sides together, and pin. 


Step 11 Fold the blue dot lining square back onto itself and align with the zipper. Pin in place and stitch using a zipper foot. 


Step 12 Turn the case right side out. Topstitch along the second zipper edge is a little trickier. You'll need to manipulate the case so the zipper edge where you're stitching is in the zipper opening, and ensure that the rest of the case doesn't get in the way. 


Step 13 At this point, your case should look like this. Press it flat so the zipper is centered.


Step 14 Turn the case wrong side out. Make sure the zipper is open! Stitch along each end using a 1/4" seam allowance. Use a zig zag stitch to finish off the raw edges. 


Step 15 Turn the case right side out and fill with pencils. 


The pencil print is an obvious choice for this case, but I love this monochromatic version as well. 


Each of my boys ended up making their own cases (with a little help) after I made these first two. This is from 3 years ago--I can't believe how much they've grown since this picture!


If you're new here, welcome! I hope you'll stay and look around a bit. 
If you like what you've seen here, you can also find me:
To find all of my quilt patterns, visit my Etsy shop. 
Find me on IG here.
Find me on Facebook here.
Sign up for my newsletter in the right-hand sidebar or here. 
(You'll receive a free pattern for my Diamond Drama quilt (below) as a thank you!)

Friday, August 20, 2021

Introducing Star Bows!

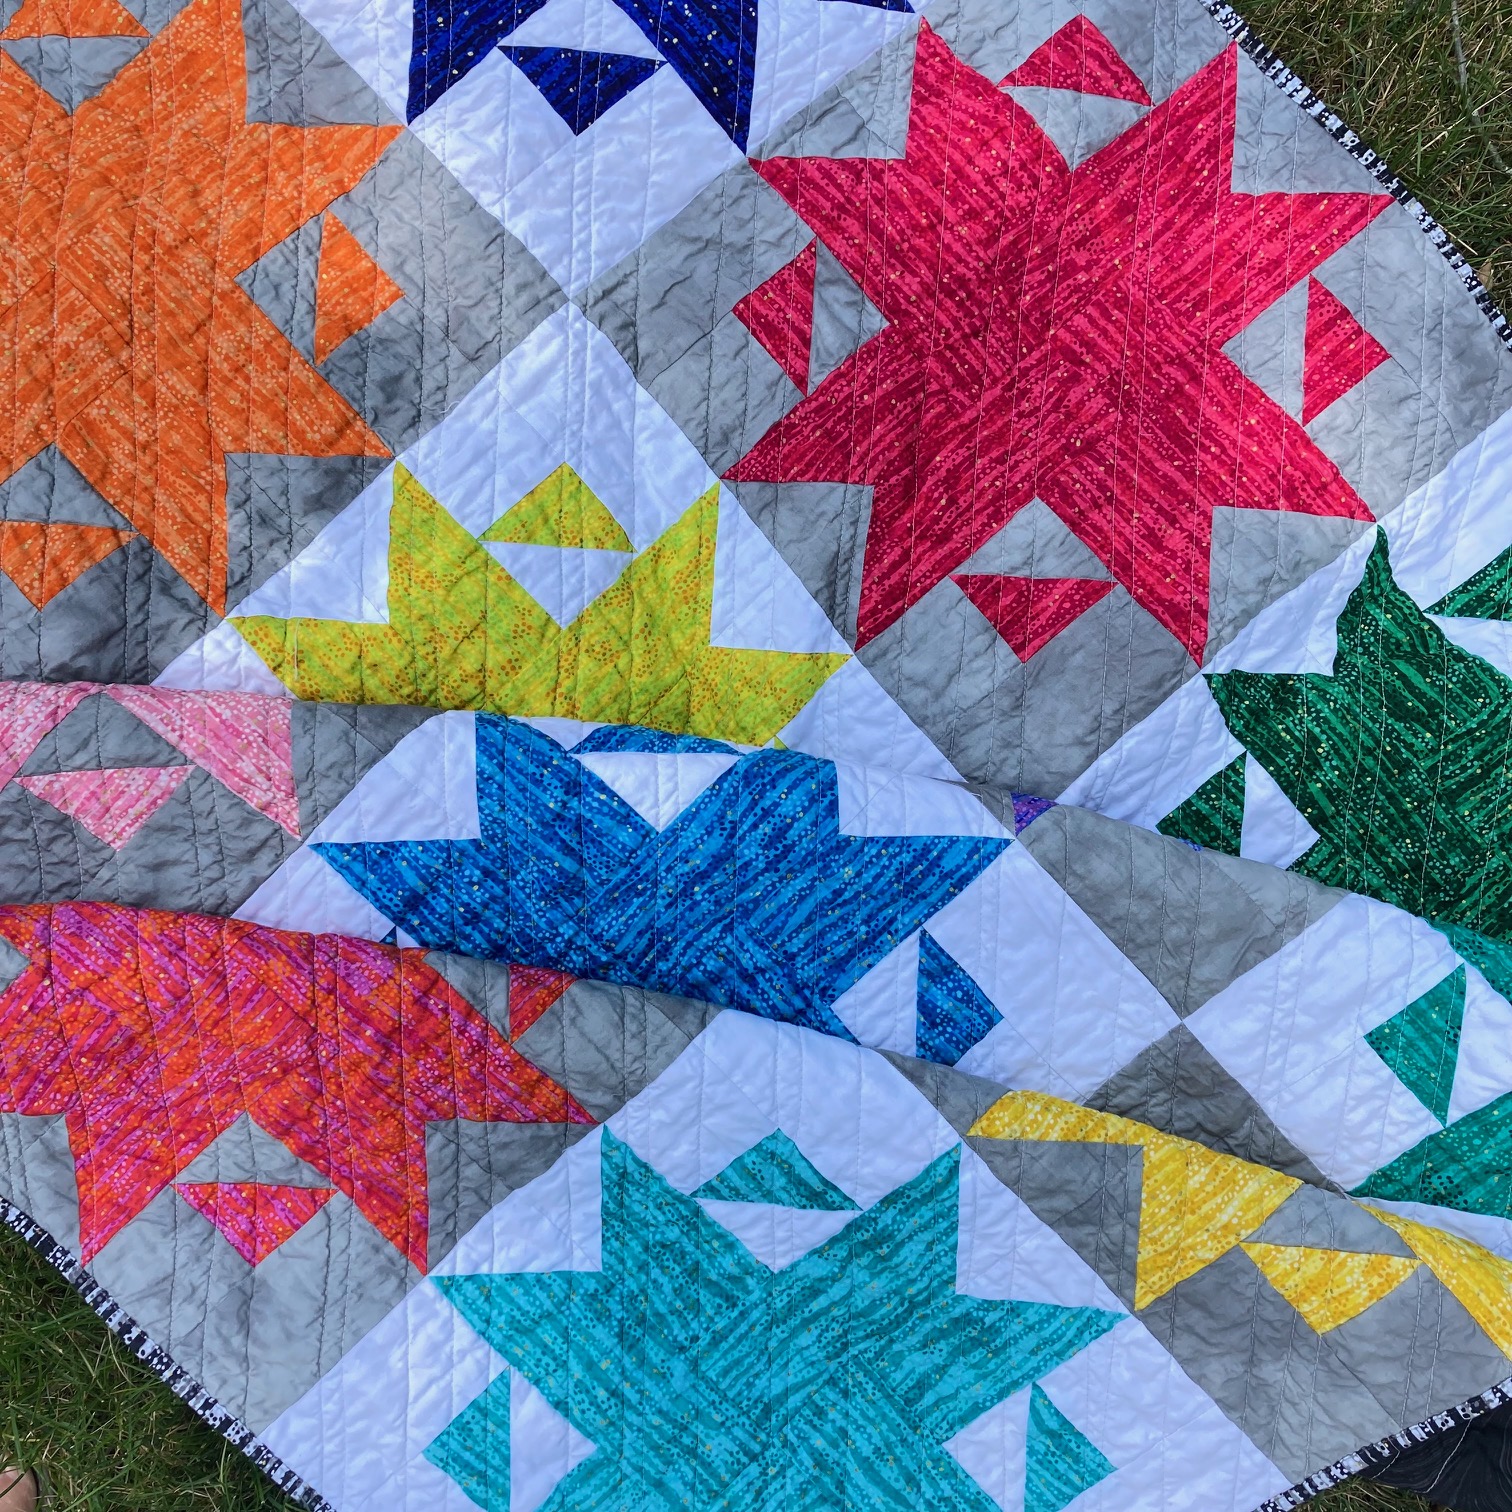
Today I'm excited to share my new Star Bows pattern with you. I love these oversized star blocks! They remind me of bows on gifts - do you see it too? I'd love to make this quilt in Christmas fabric next! Or maybe just a table runner? That seems more do-able before the holidays this year! 
Purchase the Star Bows pattern here.

I used the Dewdrop collection from Windham Fabrics for my quilt. I love the bright range of colors, plus the subtle stripes in the print. The icing on the cake? metallic dots! Aren't they gorgeous?! And did I mention that this pattern is fat quarter friendly?


The secret to this block is the direction the stripes run - they create movement in the star points. I think the alternating white and gray background colors add an extra pop to this quilt as well. 


The pattern includes directions to make this two-color version as well.
It gives the stars a completely different look!

Since it's August, my brain is in picnic mode. Wouldn't this make a fantastic picnic quilt? I took the quilt out to Paw Paw Lake for a little photoshoot - so summery looking!

Ready to make your own Star Bows quilt? You can purchase the pattern in my Etsy shop. 


If you're new here, welcome! I hope you'll stay and look around a bit. 
If you like what you've seen here, you can also find me:
To find all of my quilt patterns, visit my Etsy shop. 
Find me on IG here.
Find me on Facebook here.
Sign up for my newsletter in the right-hand sidebar or here. 
(You'll receive a free pattern for my Diamond Drama quilt (below) as a thank you!)